-->
Showing posts with label yarn. Show all posts

Monday, December 6, 2010

Chunky Ribbed Cowl - A Knitting Pattern

If this post seems totally random, it is.  I got my hand popped over at Ravelry because I didn't submit my pattern correctly.  They want it listed as being published somewhere or uploaded as a PDF so here it is, published somewhere.  :-)

If you're a knitter who follows my blog, enjoy.  If you're not a knitter, you should be. 

Seriously, it's a great "craft" to pick up.  Sitting in front of the TV?  Knit!  Sitting in the car line at school?  Knit!  Sitting in the Dr. office?  Knit!  See an awesome hat you like in a boutique, but don't feel like spending THAT much moolah?  Knit!  

If you've got a Michaels or AC Moore near you, they offer classes.  Also, most yarn stores in your area will probably also offer classes.  Know someone who knits?  Get them to teach you the two basic stitches and then teach your self the rest.  That's what I did.  Seriously, once you learn this skill, you'll never regret it.

Anyway, here's the scoop on my Chunky Ribbed Cowl.

 at full height


PATTERN
Cast on 28 stitches and work in K2, P2 rib until yarn is almost gone, leaving enough of a tail to sew up the seam.
BO and sew seam.


That's it!

folded over


Monday, November 22, 2010

Copycat Craft - Holly Jolly Wreath

Uh, have you seen this most awesomely awesome Christmas wreath that Kristy from The Diary of Dave's Wife made???


How cute is that???  It's so cute that I immediately replaced my Christmas Ribbon wreath with one.  I moved the ribbon wreath to Han's bedroom door and am now proudly displaying my Holly Jolly wreath on the front door.  I had everything I needed to make this except for the hanging ribbon so that just makes this wreath even more awesome.

Because of the kind of wreath form I used and the way I wrapped the yarn, mine looks a little like a SOS float or whatever those things are called.  I like to think that once it got it's holly leaves and berries, that it looks like a peppermint now. 

Here is my version of the Holly Jolly wreath.


Linking to:
Three or More Tues @ The Gypsy's Corner
Whatever Goes Weds @ Someday Crafts
Strut Your Stuff Thurs @ Somewhat Simple 
Sunday Showcase Party @ Under the Table and Dreaming

Wednesday, November 17, 2010

Cheater Yarn Balls

I started my blog in January.  By then, it was too late for me to share my Christmas decorations.  I've had to wait over 10 months to show these.  


I'd originally planned to make one of the yarn ball wreaths that Starbucks used a couple of Christmases ago. 
 image courtesy of Apartment Therapy


After wrapping foam balls in different red and green yarns, I decided that I didn't feel like dealing with trying to arrange and attach them to a wreath form so I ended up just tossing them in a basket, which I really liked.  I liked it enough to do the same thing with them this year.

Just like the Christmas Ribbon Wreath and the Ribbon and Yarn Trees, these yarn balls don't need a tutorial or instructions, really.  I'll just briefly explain what I did.  I've mentioned in  the past posts that I try not to use hot glue.  I can't stand those stupid strings of glue that form when you pull the gun away.  They annoy me to no end.  Anyway, I use straight pins when I wrap foam in something.  With these yarn balls, I used a good many pins throughout just to keep the yarn in place.  When you're wrapping these, you want to change directions every now and then and placing a pin right before you change directions will help you out.  You can just cover the pinhead by positioning a neighboring strand of yarn over it.


I also made these "snowballs" last year.  I had some fuzzy white yarn that I think came from Hobby Lobby and it makes the perfect snowball when wrapped around foam balls. 


I'm using a good bit of foam in my Christmas projects this year too.  I sure hope these things aren't toxic.  :-)


Linking to:
Sugar & Spice @ seven thirty-three
Hookin' Up With HOH 
Feature Yourself Friday @ Fingerprints on the Fridge
Three or More Tues @ The Gypsy's Corner  
Whatever Goes Weds @ Someday Crafts
Strut Your Stuff Thurs @ Somewhat Simple  
Show & Tell Sat @ Be Different, Act Normal 
Met Monday @ Between Naps on the Porch  
Get Your Craft On @ Today's Creative Blog  
Show & Tell Sat @ Be Different, Act Normal 
 

Sunday, November 14, 2010

Hand Knit Cowl Giveaway - REPOST

Giveaway ends tomorrow!!  Click here to enter!

**************************************


I've been working my little fingers to the bone over here, trying to get some more winter accessories in the shop.  I'm loving all of these new items!  To celebrate, I'm doing another Follower Appreciation giveaway.

The winner of this giveaway can choose from any of the following cowl/neckwarmers.  Y'all know these things are H-O-T this season, right???  

Your prize will be custom knit so it will take me a few days to get it out to you, BUT this means you may choose another color than what I've got pictured here.

 chunky cowl in cranberry


 chunky cowl in chartreuse


 ribbed cowl in Nantucket blue


ribbed cowl in oatmeal

To enter:

Since this is a Follower Appreciation giveaway,  you must be a follower.  I had quite a few non-followers on the last giveaway and I had to delete their entries. :-(

  • Leave a comment telling me that you're a follower and which cowl you'd like. 
  • FB or Tweet about this giveaway for 2 extra entries.  Make sure you leave 2 separate comments telling me you did this.  
  • Blog about this giveaway and receive 5 extra entries.  Make sure you leave 5 separate comments for this.
I'll draw the winner a week from today and announce it next Tuesday.


*  All of these cowls are for sale in my shop so if you wish to purchase one for a gift, you can do so by going here.


* Updated to add some outtakes from the photo shoot with Han.  


Friday, November 12, 2010

Foam Tree Crafts


Did you know that the Dollar Tree carries this size of the foam tree forms?  I happen to think this is totally awesome because that foam stuff is expensive!  I try to use a coupon when I'm buying it from one of the big ole craft stores.

Anyway, I wanted to share some of my little trees with you today.  The only things I had to purchase for these were the pom poms and the tree forms.  Isn't it awesome to be a crafter?  How many times have you been able to throw a last minute school project together with stuff you had lying around?  Please tell me I'm not the only one who has a child that waits until the last minute to let me know that she's got a project due like, TOMORROW.  


For these trees, I used the leftover ribbon I had from the Christmas Ribbon Wreath.  Like I mentioned in that post, I HATE using hot glue (those dang strings!) so I used pins to hold everything in place.  What's great about this is that you can reposition things until you get them just right.  This also means that the backs of your trees will look like this.


I'm cool with this because it means I don't have to deal with hot glue.  I did, however, have to use hot glue to attach the pom poms to the top of the tree.  The other day, when I was at AC Moore, I saw that they'd made some ribbon trees similar to these only they used those itty bitty foam balls, coated in glitter, instead of pom poms.  I have to say that I really liked they way that looked.  If I hadn't already made mine, I'd have done that.  Another good thing about using those foam balls is that they can be stuck to the top of the tree with a straight pin.  No hot glue! 


I made these yarn trees last year (they didn't have pom poms until this year) with some scrap yarn, some buttons (hot glue, ick), some sequins and some beads.  The tree on the right has red beads with red sequins under them, pinned onto the tree.  Cute!

We're working on Christmas crafts this weekend so look for a flurry of Christmas craft posts next week.  

Oh, have I mentioned how much hate hot glue???


Linking to:
Fab Friday @ Frugal & Fabulous Design
Frugalicious Friday @ Finding Fabulous 
Saturday Nite Special @ Funky Junk Interiors
Weekend Wrap Up Party @ Tatertots and Jello  
Crazy Christmas Crafter @ i heart naptime 
Show and Tell Sat @ Be Different, Act Normal
Handmade Holidays Hooplah @ Just a Girl
Get Your Craft On @ Today's Creative Blog
Sugar & Spice @ seven thirty-three
Whatever Goes Weds @ Someday Crafts
Show & Tell Sat @ Be Different, Act Normal 
 

Monday, November 8, 2010

Hand Knit Cowl Giveaway!!!

I've been working my little fingers to the bone over here, trying to get some more winter accessories in the shop.  I'm loving all of these new items!  To celebrate, I'm doing another Follower Appreciation giveaway.

The winner of this giveaway can choose from any of the following cowl/neckwarmers.  Y'all know these things are H-O-T this season, right???  

Your prize will be custom knit so it will take me a few days to get it out to you, BUT this means you may choose another color than what I've got pictured here.

 chunky cowl in cranberry


 chunky cowl in chartreuse


 ribbed cowl in Nantucket blue


ribbed cowl in oatmeal

To enter:

Since this is a Follower Appreciation giveaway,  you must be a follower.  I had quite a few non-followers on the last giveaway and I had to delete their entries. :-(

  • Leave a comment telling me that you're a follower and which cowl you'd like. 
  • FB or Tweet about this giveaway for 2 extra entries.  Make sure you leave 2 separate comments telling me you did this.  
  • Blog about this giveaway and receive 5 extra entries.  Make sure you leave 5 separate comments for this.
I'll draw the winner a week from today and announce it next Tuesday.


*  All of these cowls are for sale in my shop so if you wish to purchase one for a gift, you can do so by going here.


* Updated to add some outtakes from the photo shoot with Han.  


Linking to:
Get Your Craft on @ Today's Creative Blog 
Whatever Goes Weds @ Someday Crafts
Hookin' Up With HOH  
Giveaway Directory @ Someday Crafts
Market Yourself Monday @ Sumo's Sweet Stuff


THIS GIVEAWAY IS NOW CLOSED

Monday, November 1, 2010

GIVEAWAY Winner!!

Thanks to everyone who entered the Follower Appreciation Winter Giveaway.

The winner of the hand-knit hat is Danielle from Life in the Patrick Household.

Here's the hat she chose.

 
If you missed this one, don't worry!  I'll be doing a few more of these from now until Christmas.  All will be for hand-knit items.  I've got a stash to bust and my family already has plenty hats and scarves.

Wednesday, October 20, 2010

Transformations

It's funny, the way things change on you.  

When I started this blog, I wanted it to be a homemaking blog.  I was going to write about cooking healthy, whole food meals.  I was going to write about green cleaning, DIY, sewing and knitting.  If you look at my earlier posts, they follow this format.  It didn't take long for me to catch the DIY, trash-to-treasure bug.  I loved looking through the link parties and seeing these awesome transformations that people were doing and I though, "Hey, I can do that!"  So I began going to thrift stores and raiding the housewares sections, finally able to look at things with a new outlook and see past the ugly to what something could become, and with that, my blog changed.  It became a blog about DIY, trash-to-treasure & crafting.  

The same thing happened with my Etsy shop.  I was going to sell knitted items, handmade jewelry and some vintage goodies that I'd picked up here and there.  It sure didn't take long to realize that those things weren't gonna budge.  I couldn't charge enough for the knitted items to really compensate myself.  Nobody wants to pay $26 for a hand-knit hat when they can go to Target and get a really cute one for $10.  Plus, $26 was ripping me off.  The yarn alone costs about a third of that, and my time is more valuable than $2 an hour (time spent knitting the hat).

 At the same time, I had so much stuff that I'd thrifted, out in the garage, waiting for me to paint it.  There was also the question of where would I put it once I did paint it.  My house is already decorated and there is no room for new stuff.  At the same time, I needed projects to keep my blog going.  I needed that stuff.  Charles suggested I try to sell that stuff on Etsy.  I was hesitant at first, until I started poking around on Etsy and seeing that people WERE selling stuff just like that.  So a few weeks ago, I pulled some stuff out, painted it and listed it, and do you know what???  People started buying it!  I've made 10 sales in the past three weeks.  I feel that the closer it gets to Christmas, the more I'll sell.  By selling this stuff, I'm actually making the profit that I feel I deserve.  The items are inexpensive for me to buy, it doesn't take long at all for me to work on them and so I'm able to sell them for a cheaper price.  Both my customers and I win!

Since I'm here talking about changes and transformations I do actually have something to show you.  

The after:

The before:


Amazing what a little paint and glaze can do!


If anyone is interested, these are for sale in my shop


Linking to:
Look What I made @ Creations by Kara

Sugar & Spice @ seven-thirty-three
Whatever Goes Weds @ Someday Crafts   
We Did It Weds @ Sew Much Ado
Cheap Thrills Thursday @ Black Kat Design  
Get Your Craft on Thurs @ Life as Lori 
Transformation Thurs @ The Shabby Chic Cottage 
Under $100 Linky Party @ Beyond the Picket Fence
Strut Your Stuff @ Somewhat Simple
Hooking Up With HOH
Feature Yourself Friday @ Fingerprints on the Fridge 
Frugal Friday @ The Shabby Nest 
Frugalicious Friday @ Finding Fabulous 
Everything But the Kitchen Sink @ A Little Knick Knack 
Fab Friday @ Frugal & Fabulous Design   
Sat Soiree @ A Little Lovely 
Show and Tell Sat @ Be Different, Act Normal 
Sat Nite Special @ Funky Junk Interiors  
DIY Project Parade @ The DIY Showoff  
Motivate Me Monday @ Keeping it Simple  
MMM Day @ C.R.A.F.T. 
Just Something I Whipped Up @ The Girl Creative  
You're So Very Creative @ Me Making Do 
Met Monday @ Between Naps on the Porch  
Make it 4 Monday @ cottage instincts  
Craft-O-Maniac Monday 
Market Yourself Monday @ Sumo's Sweet Stuff  
Trash to Treasure Tues @ Sassy Sites 
Power of Paint Party @ Domestically Speaking
Make it Yours Day @ My Backyard Eden
Motivate Me Monday @ Keeping it Simple 

Saturday, October 16, 2010

Because the Heat Kicked on This Morning


And because I really really am so tired of Fall and Halloween decor.  So tired of it that I'm not even going to share anymore of my Halloween projects.  I think I might do a post on costumes and maybe a Halloween post on the 31st, but that's it.  I think all of us blogger babes just started too early with the Fall stuff and now it's worn out it's welcome for me.  Oh, but after Halloween, I'll be bringing the Fall stuff from Sept back out because we host Thanksgiving here and I can't not have any seasonal decor out.  Oy..  :-)

Our tradition is to decorate for Christmas on Thanksgiving night, after everyone has gone home.  Sometimes, we're just to dang tired to do most of it and so, we do some that night and then the trees (yes, I said treeS) the next day.  I'm sure most of you have more than one tree.  I would imagine that women so into projects and decorating, like myself, would have more than one tree theme.  Am I right?

Anyway, since Thanksgiving is only a little over 5 weeks away, I've already gotten a start on my Christmas crafts.  What I'm showing is actually winter stuff, but it'll be going out Nov, 25th too.


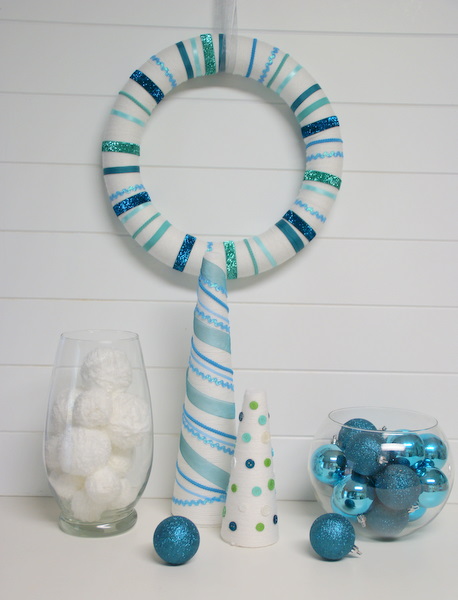
This is just a styrofoam wreath form, wrapped in white yarn (yay for stash-busting!) and then in various blue-ish ribbon.


Styrofoam tree forms wrapped in white yarn and then embellished with ribbons and buttons.  The Dollar Tree has the small trees, which is a steal.


 I made these "snowballs" last year.  Just wrapped styrofoam balls in a fluffy white yarn.  Easy Peasy!


Just wanted to add that the only time I used a hot glue gun (hate 'em) on these was to glue the buttons onto the one tree.  I do all of the wrapping with straight pins.  A lot less messy AND can be undone easily.  

Anyone else gotten a jump start on their Christmas/Winter projects?


Linking to:
Sat Nite Special @ Funky Junk Interiors
Sunday Showcase @ Under the Table and Dreaming
Check ME Out Sat @ A Vision to Remember
Sat Soiree @  A Little Lovely
Sat is Crafty Day @ Along for the Ride 
Sundae Scoop @ i heart naptime 
Just Something I Whipped Up @ The Girl Creative 
Met Monday @ Between Naps on the Porch 
DIY Project Parade @ The DIY Showoff 
Craft-O-Maniac Monday
Motivate Me Monday @ Keeping it Simple
Making Monday Marvelous @ C.R.A.F.T. 
Market Yourself Monday @ Sumo's Sweet Stuff 
Making the World Cuter Monday @ Making the World Cuter 
You're So Very Creative @ Me Making Do
Get Your Craft On @ Today's Creative Blog 
Lucky Linky @ Lucky Star Lane
Take-a-Look Tues @ Sugar Bee
Anything Related @ All Thingz Related
Look What I made @ Creations by Kara
Whatever Goes Weds @ Someday Crafts 
Make it Yours Day @ My Backyard Eden 
Crazy Christmas Crafter @ I heart naptime 
Just Something I Whipped Up @ The Girl Creative 
2nd Annual Holiday Highlights @ The DIY Showoff 
Whatever Goes Weds @ Someday Crafts 
Hookin' Up With HOH 

Wednesday, September 22, 2010

Stashbuster/Fiber Fall Wreath - Putting It All Together


Ok, time to put it all together.  If you're following along, you should already have your leaves and acorns finished.  If not, see parts 2 & 3 for instructions on those.


The other items you need are:
  • a styrofoam wreath form
  • straight pins
  • yarn to wrap around the form
  • hot glue gun


1 - To start, pin the tail of yarn to the wreath and start wrapping, passing the yarn ball through the center.  I like to stick a straight pin in every now and then to keep everything in place.  You'll cover the pin heads up when you do another pass of the yarn.  I did three passes of wrapping yarn.  On the first pass, I didn't worry too much about covering all of the styrofoam.

After you finish wrapping, cut the yarn and pin the tail to the wreath, making sure to tuck the tail and cover the pin head with some of the wrapped yarn.


2 - After arranging the leaves on the wreath, pin them into place.  I covered the pins from the first, second and third leaves with the next leaf.  For the last leaf, I pinned it from the back and hid the pin head under some of the embroidery thread used for the "veins".

3 - Use your glue gun to glue the acorns into place.


That's it!  I haven't really gotten a lot of feedback on the actual wreath (plenty on the acorns) so I don't know how much interest is out there.  I just thought it's be nice to have a tutorial because you never know.  Someone might stumble upon it in 5 years and really want to make one.  


I've got PLENTY of Halloween posts lined up so stop back by for some Halloweeny inspiration!


Linking to:
Thrilling Thursday @ Paisley Passions

Monday, September 20, 2010

Let's Make Some Acorns, Y'all! - Felted Acorn Tutorial


Felted acorns have been showing up everywhere online recently.  People are even selling them on etsy!  I'm here to show you how to make your own.  I'm sure there are several ways to make them, but this is the way I did mine.  I did google the subject before I started and one thing that came up was a video.  I only watched a few seconds of it because the woman in the video was using a roving (a long and narrow bundle of fiber. It is usually used to spin woolen yarn) and I wanted to use yarn.  You can buy roving at most craft stores either in a natural color, that you would dye on your own, or pre-dyed.  Being able to buy roving at a craft store makes making the acorns that way, easier, but since I've never made acorns from roving or even felted a roving before, I don't know how much you're gonna get out of those little packs of roving.  To me, using yarn just made more sense, because I already have so much of it on hand.  I do have some natural roving, but I didn't want to deal with dyeing it.  I wanted to get right to the making of the acorns part.
 

To make the acorns with yarn, you will need:
  • 100% wool yarn in various colors
  • a tape measure
  • liquid soap
  • scissors
  • glue gun or super glue
  • acorn caps

I tried several different 100% yarns and I got the fastest and best results with Patons Classic Wool.  I buy mine at AC Moore.  I'm not sure what other craft stores carry it.  *** edited to add that Michaels carries this yarn too.


Run a sink full of hot water.

For a large acorn, cut 180 inches of yarn.  If you're making a small acorn, start with 60 inches.

Wad it up.

Wet it in hot water.  Wet woolen yarn is STINKY.

Begin to roll it between your palms. 

After about 30 or so seconds of rolling, it will look a little like this.

Add some soap.

Roll some more.

Pet your helper.

Your yarn mass should begin to look like this.  Keep rolling.  Alternate adding soap with rinsing in hot water.  Keep rolling and squishing.  You can shape your acorn while you're doing this.  It's kinda like rolling Silly Putty between your palms.

One last rinse in hot water.

There might be nubbins.

Cut 'em off, but don't throw them away.

You can do a little more of the felting to soften the cut edges.

Test your acorn body to make sure that it'll fit inside the acorn cap.  If it's too big, use a bigger cap, or cut away the excess.

Let the acorn body dry a bit.  I did this one while it was still damp and it's fine.

Apply glue inside the cap.

Squish the acron body in and hold it for about a minute (long enough for the glue to grip).


Voila!  Your acorn.  That little baby one... it was made from a nubbin. 


Whew!!  Wow, that's a lot of pictures!  I hope that this was clear enough for someone who isn't familiar with felting, to be able to make these.  If you've got any questions, just ask in comments.

Come back tomorrow for part three of the Fiber Fall Wreath Tutorial Series; felt leaves and putting it all together.


This post is Part 2 of 4 of my Fiber Fall Wreath Series.
See Part 1 here.

See Part 3 here.


Linking to:
Countdown to Fall Party @ Domestically Speaking
DIY Project parade @ The DIY Showoff
Anti-Procrastination Tuesday @ New Nostalgia
Anything Related at All thingz Related
Three or More Tuesday @ The Gypsy's Corner
Tutorial Tuesday @ Hope Studios 
Take a Look Tues@ Sugar Bee - Craft Edition  
Get Your Craft On @ Today's Creative Blog 
Met Monday @ Between Naps on the Porch 
Just Something I Whipped Up @ The Girl Creative 
Trendy Treehouse Creative Share
Fall Festival @ This Blessed Nest 
Whatever Goes Weds @ Someday Crafts 
Make It Yours Day @ My Backyard Eden
Look What I Made Day @ Creations by Kara 
Show & Tell @ Blue Cricket Design 
We Did It Weds @ Sew Much Ado 
Get Your Craft on Thursday @ Life as Lori 
Strut Your Stuff Thurs @ Somewhat Simple  
Thrilling Thursday @ Paisley Passions
Transformation Thursday @ The Shabby Chic Cottage  
Hookin Up W/ HOH @ House of Hepworths  
Under $100 Link Party @ Beyond the Picket Fence  
Feature Yourself Friday @ Fingerprints on the Fridge 
Frugal Friday @ The Shabby Nest 
Show Off Fall Festival @ The DIY showoff  
Frugalicious Friday @ Finding Fabulous 
Get Your Halloween On @ Sawdust and Paper Scraps  
Remodelaholic's Anonymous @ Remodelaholic 
Saturday is Crafty Day @ along for the ride 
Check Me Out Sat @ Along for the Ride 
Sat Nite Special @ Funky Junk Interiors 
Link Round Up @ The Idea Room 
Style Feature Sat @ Perfectly Imperfect 
Making Monday Marvelous @ C.R.A.F.T.  
Met Monday @ Between Naps on the Porch  
Market Yourself Monday @ Sumo's Sweet Stuff  
Upcycled Awesome @ The T-Shirt Diaries