-->
Showing posts with label makeovers. Show all posts

Tuesday, March 4, 2014

Choosing Upholstery Fabric - Decisions Decisions


During the past month or so, I've been on a mission to replace our tired living room furniture.  We haven't had it a really long time, I think maybe 7 years or so, but my style has changed, and as I'm sure many of you already know, a cruising baby, and then toddler, can wreak havoc on furniture.  I feel like, if I were ever asked, I would recommend leather furniture to anyone who is planning to have children.  Either that, or something covered in a pattern that can camouflage the food and milk stains that will inevitably cover the edges of the seat cushions. 

Another issue I've been having is that we only have the sofa and one over-sized matching chair.  I love the chair, but goodness it sure takes up a ton of room! When we have people over, one of us usually ends up sitting on the floor, or depending on how many people we have over, we bring in a few dining room chairs.

For a couple of weeks, I'd been looking at furniture online, but was having a hard time finding something I really liked, that was also affordable.  It seemed the stuff I liked was crazy expensive, or I either liked the style or the fabric, but never both. 

One day, I was cruising my local Goodwill when I spotted this chair.

Aside from the fabric, it's gorgeous, and at only $35, it was a deal I couldn't pass up. 


A couple of weeks later, I was poking around on Pinterest when I ran across a gorgeous velvet Louis XV sofa. I mentioned to my husband that I would love to find something like it one day.  Later that afternoon...

$95!!  It was in excellent shape too!  


About a week later, I was out at the same shop where I got the sofa, and decided to look at their furniture again to see if I could find a wing-back chair similar to the other one.  I saw this dingy blue chair that looked like it would work, but it sure looked sad.  Until I saw the price!  I paid $4 for it.


So now the mission is to get these recovered which is something I've never had done before.  I contact one local business and was given a quote for labor and fabric yardage needed.  I'm still planning on checking around for a couple more quotes, but at least I have a starting point for how much fabric I'll need.

Choosing fabric will be the most difficult part of this.  I'm incredibly indecisive with just mundane, small things so this will be a big decision for me!  Of course, my husband and I have to agree on the choice too so that makes it even harder.  I also have to consider our two-year-old.  We are pretty much out of the food and milk gunk on the cushions, but I know there will be some occasional spills.  I need something that is easy to clean.  I'm leaning towards something neutral, and would love to just do linen, but I'm pretty sure linen isn't going to be kid-friendly.

I've been pinning ideas of what I might like, I just need some input and some fabric suggestions.  If you have any, please leave a comment!  Please???

The seat cushions on the sofa are very firm, and we believe they're stuffed with horsehair so we'll be having those replaced. I'm considering just one long cushion, like a bench cushion.  Has anyone ever owned a sofa with just one cushion?  What did you think of it?


This is the overall look I'm going for in the room.  Lots of neutrals.  Am I just setting myself up for failure, with a toddler in the house?  
unknown source


I'm planning to paint all of the wood details white/off-white, and then I'll distress them.


I love the nubby look of this fabric.  Is that linen?


I'm thinking I'd like just one long cushion like this, but I'm not sure how practical that is.  Will it stay put, or will it just get all wonky when people move around  on it?  Would two cushions be better?


I love the throw pillows on this one, but I think the seat cushions might be a little too firm.


 Most of the images I've looked at have fabrics in the brown family, but I like this grey too.


So much squish! 


Ok, so I know a lot of people just read posts, and don't usually comment, but if you have any input that you think might help me, would you please share in the comments?


Tuesday, September 25, 2012

DIY - Faux Antiqued Pumpkins


It seems like you can always find inexpensive foam pumpkins in all the craft stores.  There are oranges, browns and even greens (I guess those are technically squashes), but never white.  I can never find cheap small white pumpkins.  This year, I decided to do something about it.

I bought a collection of various foam pumpkins.  The larger ones, which I haven't finished yet, I got at Target for $2 each.  The smaller ones came from Big Lots at a buck each.  Wal-Mart also has the small pumpkins for about the same price.  I was in Michael's today and they have their Fall decor items on sale this week.  Basically, there's no shortage of these cheap pumpkins.


So you take your pumpkins, and gather the following:
  • brown craft paint
  • antique white craft paint
  • crackle medium
  • glaze

Directions:
  • Paint a couple of thin coats of the brown craft paint onto your pumpkins and let them dry.
  • Following the directions on your crackle medium, apply crackle.
  • Next top coat with the antique white.

After pumpkins have completely dried, do another coat of antique white.  Do this until you like the look you have.  Alot of my cracks were filled in, but there were just the right kind of crack let after my third coat.  The reason I didn't stop at one coat is because if  you brush the first topcoat over the glazing medium too hard, you'll smudge it and it won't look so pretty.  I tried two different crackle mediums, one that you let dry completely before you brush on the topcoat, and one that you just let dry until tacky before brushing on the topcoat, and they both smudged in spots.  The extra topcoat layers hide this.

Once your final topcoats have dried, it's time to glaze.  See here for my glazing tutorial.  

After you've glazed, you might want to go back and paint your stems.  I just used my brown craft paint on mine.


Here's a close-up of my finished pumpkins.


 These beauties are great for a neutral Fall look and for Halloween.


Linking to:
Wow us Weds
Creative Spark 
Made by Me
DIY Fall Festival
Sugar & Spice 
Hookin' Up With HOH
Liz Marie


Monday, September 10, 2012

Jewelry Box Makeover

I haven't blogged much during the past year, but I swear I've still been making.  For whatever reason, I just haven't had it in me to take all of those photos (you know how we take about 100 shots of the same thing just to get the one perfect photo for the post?).  Plus, there's writing the actual post which has never been my strong point.  There are those bloggers who consider themselves writers and then there are those bloggers who are like me.  We just want to get it out there and move on to the next project.

I let my Etsy shop lapse last year during my pregnancy.  I've just recently picked back up on it and have been bitten by that thrifting bug again.  I have to be REALLY careful with that.  I think a lot of us have to be careful with it.  Have you ever watched an episode of  "Hoarders" where they follow the person to a thrift shop and thought, "Oh man, that's so me!"  These people are acting like they're on a freaking treasure hunt, which is exactly how I feel when I walk into a thrift shop and grab a cart.  It's so easy to get carried away with the, "Oh, I can use this for something," or even worse, "So and so can use this for something."  Do you know how many hoarders I've seen who buy stuff for other people?  Stuff the other people probably don't even want.  

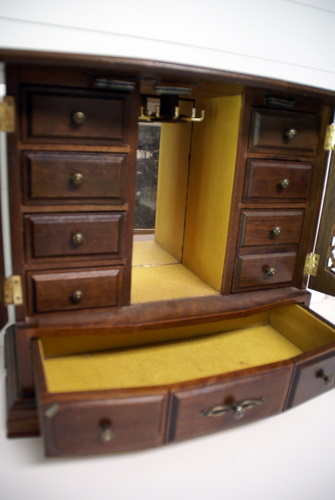
OK, I've gotten a little carried away.  I'm not really here to talk about my hoarding tendencies.  I'm here to show you a makeover.  A couple of weeks ago, I found two nice jewelry boxes.  Normally, I find these boxes with the tacky flowers etched into the door glass.  Ug...  I'm sorry, but no amount of paint is gonna take away from that.  I finished the first box a couple of weeks ago and have already listed it in my shop.  The other one is almost finished and should be listed tomorrow.  


AFTER:


BEFORE:


Isn't that the coolest box?  I mean, even before, it was cool.  I knew right away what color I was going to use (Folk Art's Patina).  It looks perfect with the red interior!


Linking to:
Anti-Procrastination Tuesday
Get Your Craft On 
Made By Me
Wow Us Weds
Creative Spark
Look What I Made 
Sugar & Spice 

Friday, August 17, 2012

Trinket Box Makeover

It might be hard to believe, but it took me over two years to decide what to do with this box.  Back on April 8th, 2010, I blogged about thrifting this and asked for suggestions on what to do with it.  I just couldn't decide.  I've been using it just the way it is ever since.  For awhile, I had it sitting in my half-bath.  Then I ended up just shelving it in my studio.  


A few weeks ago, I found a paint color that I thought would work well with glazing.  It's an Americana craft paint, which you can get at any big-box crafts store, called Sea Glass.  It's a creamy pale aquamarine color that's great on it's own, but when it's been glazed over, it's gorgeous! 

It's my new favorite color so I'll soon be off to Home Depot for a color match. I've found that these craft paint bottles dry out too quickly, plus it costs more to keep buying those little bottles than it does for a sample from Home Depot or Lowe's.  


***See my glazing tutorial here.***


Saturday, August 13, 2011

Master Bedroom Inspiration

I may have mentioned that we're moving our bedroom from downstairs, to one of the bedrooms upstairs.  To make a short story long, as Leslie likes to say, we'll be switching Charles' music studio with the master bedroom.  His studio, is next to the bedroom that Han occupied until a couple of weeks ago.  We moved her down the hall and we'll use her old room for the baby.  The short version of this is, we want to be closer to the baby.


There were some other deciding factors in this, mainly that it's too loud on the main floor.  Not only do I hear every cricket living in the backyard, but our room shares a wall with the living room and as luck would have it, it's the TV wall.  Charles rarely goes to bed before I do, so when I do go to bed, it's like I'm trying to sleep in the living room.  Another plus to moving is there'll be no more lugging laundry up and down the stairs.  The laundry room will be right down the hall!  One last plus is that I'll get the whole closet (not a walk-in) to myself.  Charles will keep his clothes in his studio since he'll still be using the master bath (I'm now sharing a bathroom with Han.)


When we first began talking about the move, my first concern was as to how I would decorate the room (of course!).  I just finished the current master look in March, but it just felt odd to do another room exactly the same.  I looked around on Pinterest, and pinned a lot of photos, and decided that I basically wanted the same kind of style, but I'd just switch it up a bit.


The walls have been painted and I chose a Better Homes & Gardens (Wal-Mart) color called Creamy Pebbles.  I had it color matched at Lowe's in Valspar paint with and eggshell finish.  I found the color through Leslie from Goodbye House, Hello Home.  She used it in the bedroom that her foreign exchange student is staying in.  It's a beautiful room, so you should go check it out!  BTW, I don't think I've mentioned this before, but Leslie and I are friends IRL. We met through our blogs and found that we only live about 15 minutes away from each other!


Since Charles is still working on the new floors and trim, I obviously won't be sharing any photos of the room today, but I'd like to share some of the pins I have for inspiration.


Here's my Pinterest link to this board.  You can find the source for each photo by visiting the pin.


I'll most likely be using white bedding with neutral throw pillows.  I especially love the throw on this bed.  Pottery Barn has some that I love, but I was't really wanting to pay PB money for one.  I thought I'd make one myself, but after I totaled the yarn costs, I found that it would be just as expensive as buying one from PB.  I'll still check around to see if I can find a cheaper version, but since I'm not buying new bedding this time, I think we can maybe splurge on a throw (that baby can spit up on... ha!).


This wall color is similar to Creamy Pebbles, and I absolutely love this bedding!


Not sure if we'll have a bedside rug, but I do love this one!


I'd love to make some pillow similar to these for the bed.  If anyone know of a good tutorial, please let me know.


I thought something like this would look nice over the bed, but since we have a tall-ish headboard, I don't think it'll work.  I still like it, though!


I really like this plate arrangement.  I'm planning to move the green desk from our foyer into this room, and if we don't end up installing a TV in the wall over it, I'd like to hang some plates there.  This space is between the two windows in the room, and I think this piece of wall, with the plates on it, would look nice framed by the windows. 


I've got all of the pieces for this little set-up by Miss Mustard Seed and I thought that it'd look great on the desk.


I pinned several boxwood wreaths because I wanted to make one to hang in a large empty frame I plan on using.  I haven't been able to find faux boxwood stems anywhere, and finally just ended up doing a coffee filter wreath.  


I haven't made too many final decisions yet, as far as what will hang where, because I want to wait and see how furniture placement goes first.  This room is considerably smaller than the current one and so I'm not sure which of the two possible ways we'll be arranging the furniture.  Hopefully the transformation will be completed by midweek.  If so, I'll get started on everything that needs to be made and get a post up asap.


Hope everyone has a great weekend!

Tuesday, August 9, 2011

My Piecemeal Hutch


I'd been wanting a hutch for my dining room since I first started following blogs where very talented ladies perform fabulous makeovers on furniture.  I spent about a year hoping to score a hutch at GW.  It didn't seem to matter that I made the trek to my local shop at least three times a week, I never found one.  Not only could I not find one to buy, I couldn't even find one that someone else had already snatched up.  I guess people around here just don't want to give up those hutches!

I finally began looking for anything that would do the job, and I eventually wound up with two pieces that when put together, make a hutch.  I bought the bottom half from a GW for $40, and I scored the top from an auction for $10.


I filled some holes and Charles mended some pieces.


After we got it all fixed up, it was time for paint.  For the bulk of the hutch, I used an Olympic color called Dogwood Blossom.  I wanted the back to contrast against the rest of the hutch because I'm planning to display white dishes and milkglass at some point.  I ended up using Sea Anemone for the back.  I thought it was a great color for either a beachy look for a Shabby Chic look.


After painting, we added new hardware that I picked up at Hobby Lobby for a few buck each.  I'm still trying to decide if I want to paint and distress those.  For now, I'm leaving them the way they are.


I just love this hutch, and I think even more so because it was something I had to put together, and I was able to do it for just a few bucks.


What do you think?


Linking to:
Twice Owned Tues @ House of Grace
POWW @ Primitive & Proper
Restored It Weds @ Restore Interiors
Wow Us Weds @ Savvy Southern Style
Creative Spark @ Clean and Scentsible
Whatever Goes Weds @ Someday Crafts
Transformation Thurs @ The Shabby Chic Cottage
Under $100 Linky Party @ Beyond the Picket Fence
Crafty Soiree @ Yesterday on Tuesday
Hookin' Up With HOH @ HOH
Furniture Feature Friday @ Miss Mustard Seed
SNS Special @ Funky Junk Interiors
Met Monday @ Between Naps on the Porch

Monday, August 1, 2011

Spice Racks - Not Just for Spices

Han is all moved into her new room, and is working on getting it all set up today.  We still need to accessorize and order her new furniture, so I won't be sharing photos of the room until it's actually complete.


I was trying to come up with some way I could contribute to the room since all of the hard work was being done by Charles, and the design work by Han.  I have a ton of spice racks in my stash, and I thought one might be useful to her as a rack to hold her nail-polish.


I used spray paint this time (I was careful of the fumes!), which seems to be winning me over again since it doesn't take nearly as long as brush painting does.  It seems I no longer have the patience to work on a project for days.  This was a can of Rustolem Green Apple that I bought last year when I first began doing makeovers.  Basically, this was a free project, which is the best kind!


I'm loving how the green looks against the aqua wall.


I also love how she went all ROYGBIV when arranging them.  


Linking to:
Met Monday @ Between Naps on the Porch
Made it by Monday @ Made it for Monday
Mad Skillz Party @ Mad in Crafts
Get Your Craft On Tues @ Today's Creative Blog
Trash to Treasure Tues @ Sassy Sites
One Project at a Time @ A Bowl Full of Lemons
Wow us Weds @ Savvy Southern Style
Creative Spark @ Clean and Scentsible
Frugal Friday @ The Shabby Nest
Feature Yourself Friday @ Fingerprints on the Fridge

Tuesday, July 26, 2011

While She Was Out... Again - Part One

Just like this same week last year, Han has gone on a beach vacation with a friend. Just like this same week last year, Han is getting a room makeover. Actually, she's getting a new room altogether. We'll be using her current room as the nursery for baby since it's right next to the room that will become the master bedroom. A lot of work for one little baby, huh?

The room that is being transformed for her is what we have been calling "The Cat Room" for the past few years. It's the only spare room in our house, and that's where we've been keeping the litterboxes and cat food/water bowls. It also acts as a dumping ground for any type of home item that I'm not using, but may need one day. Sound familiar???
I know I'm not the only one!

Here are some photos I took last Jan when I was working on
Kicking the Clutter. Although, I got rid of some stuff then, this room actually got much worse than what you see in these photos. I ended up putting all of these Christmas bins in there, and I started putting my pre-makeover Etsy items in there too.

A couple of weeks ago, we began to purge. So many items that still had Goodwill tags on them, went back to Goodwill, and probably 1/4 of my Christmas stuff went there as well. I still need to go back through my "keep" items and purge more. I seem to have kept more than I let go. Do I sound like someone on "Hoarders" or what?

Aside from some furniture painting, purging is about the extent of my involvement in this room. Charles is doing everything else. No painting or heavy lifting for me!

The difference between this makeover and the last is that we won't be finishing this while Han is gone. Turns out while I (and half of the blog world) loved her last room, she didn't. She said that she didn't get to choose anything and it wasn't "her". Grrr, right? This time, I'm letting her choose everything so she can't some to me in six months and say she doesn't like it. I have to admit, this is killin' me, y'all. I know it's her room, and I should let her have a room she loves, but it's driving me crazy!

Here's the paint color she chose. It's a Valspar color called Sea Wave.
I will admit that once Charles got it on the wall, it didn't look bad. I can live with it. Not only do I think I can live with it, I'm actually considering a lighter color from the paint chip card for the nursery.


The problem I have now is the bedding she's chosen. We've already purchased it, but I'm itching to return it.


It totally works with the wall color but, I want to return it because the dresser I'm planning to repaint for her room is a completely different style than the bedding. It's an old Broyhill dresser from the 70's (I think) and it's French Provincial. Here's one someone else made over. The dresser I have only has 6 drawers, but you get the idea.

image courtesy of Rethunk Junk


Not gonna match, right? I'm hoping I can find something a little more feminine that she'll agree with. I know I'm not the only person out there who has struggled with the dilemma of letting a teen design their own room, but wanting it to look good. Have any of you gone through this? How did you handle it? Compromise or give in completely?


Sunday, July 24, 2011

Krud Kutter

I'd like to start out by saying that I'm in no way being compensated for this post. I'm simply sharing a product that I love, with my readers and fellow bloggers.

If you follow my blog regularly or have taken a peek at my Etsy shop from time to time, you know that most of my makeovers involve wood items that I've thrifted such as candlesticks, pedestal bowls, spice racks, knife blocks, napkin holders. If you've made over these kind of items you know that they are usually filthy when you buy them. The kitchen items, which are mostly what I deal with, can be especially grimy, with layers of caked on grease and dust. You know, the kind of gunk that just won't come off with a quick little soapy wash. Not only that, since you're dealing with wood, it's not like you can scrub and scrub with soap and water. I'd like to point out here that I once got adventurous with a particularly nasty spice rack and ran it through the dishwasher. I guess you can imagine how that turned out!

Anyway, I finally found something that gets rids of the grime in minutes. It's called Krud Kutter and it's fabulous! I originally bought a small bottle just to see it worked. After one cleaning, I was hooked! It's just amazing. Not only does it clean that nasty gunk, it also tackles the bazillion price tags the thrift shops like to stick all over everything! One thing it has going for it over other chemical removers is that it has a very low odor.


I've found the best way to use it on my thrifted items is to soak a cotton ball in it and the use that to wipe the piece down. You can use q-tips to get down in any nooks and crannies the piece might have. I have from time to time, had to clean a piece twice, but that's usually it. The stuff evaporates in no time so you can almost start painting immediately after cleaning. That's one thing you can't do after cleaning with water!

I've gotten my Krud Kutter at Lowe's in the past, but I've also seen it at Wal-Mart, back in the paint section. It only costs a few bucks which makes it an even better product in my book!

Monday, June 27, 2011

Antiqued Wall Sconces

Happy Monday!  I hope everyone had a great weekend!  My posts have been a little scarce the past two weeks, but I hope to be back in the saddle from now on.  There's been a lot happening over this way and I hope to be able to share it with you guys soon.

Today, I'll be sharing a new glazed piece with you.

I think anyone who thrifts has seen this gold-ish plastic stuff before.  


This stuff seems to have been popular in the late 60's, based off of some of the dating I've seen on the back of some of it.  Two manufacturers that I can remember off of the top of my head are Homco & Syroco.  While this stuff might be ugly as is, it looks great painted, and even better painted and glazed.


Honestly, these weren't too bad before, but I don't usually buy something and just leave it alone.  I really love how the glaze helped bring out all of the details.  It really added a lot of depth to them.

Thanks to everyone who commented on my last post.  I'm planning to start on the jewelry box this week.  It's a pretty detailed piece so I expect it to take me awhile to finish.  I'll definitely be posting on it when I get finished.

Linking to:
Met Monday @ Between Naps on  the Porch
Get Your Craft On @ Today's Creative Blog 
Twice Owned Tues @ House of Grace 
Restored it Weds @ Restore Interiors 
Mad Skillz Party @ Mad in Crafts

Wednesday, June 22, 2011

Color of the Week???


I'm not sure, yet.


Last month, I was inspired by this post from knack, to try a similar color.  I chose Martha's Rainforest.  It's a rich blue-green that I thought would appeal to those who aren't really into the whole cottage look.

I decided to try it out on this mug stand, and I have to say, I'm just not sure about it.  Maybe it's because it's not really my style.  I prefer the lighter colors that make up the shabby cottage look and this definitely isn't one of those.  It seems a little plain to me, and maybe it just needs to be distressed to add a little oomph to it.  What do you guys think? 


Even though I don't really think I like this color on the mug stand, I do think it might be perfect for this jewelry box that I scored at an auction awhile back. I think the design of the box, coupled with this vivid color, would make a nice India-inspired piece.  Yes???


*This post is part of a series of color posts.  To see all past colors, click here

Monday, June 13, 2011

Color of the Week - Meadow Mist

This week's color is another blue.  For whatever reason, I seem to be stuck on blues and greens.  I do have a couple of pink pieces that I've done and I'll probably be sharing that color next week, just to change things up a bit.

This color was used on two projects that I shared with you last week.  I'm reposting the photos below since these are the only two completed pieces I've used this color on.  I've got one piece that I'm still working on and I'll share that with you later this week.
cloche post is here

the shelf post is here


This is another great beachy color, but it's also a good shabby chic color too.  I'd say that if Sea Anemone and Sea Glass had a baby, this would be the result.  It's a Valspar color called Meadow Mist.  

I have to tell ya, the sample colors they show online usually DO NOT match the true color at all.  You can tell the difference between what's being shown on the link from Lowe's (above) and my photos.  This particular color has more green in it than what they're showing.  That just shows you how different a color can appear online.  I try to get my photos as close to the actual color as possible, but even that is a problem sometimes.  If you're in doubt, trust the paint chip from the store.  I'm not talking about the online chip, I mean the one you grab at the store.  That will be more reliable to you, in person, than what they show online or what I share with you.

I've been having fun with these color posts and I'm excited to try some different colors.  I'd like to step out of my comfort zone and go with something completely different than what I've been using.  So far the colors I've shared, have all been ones I had on hand.  I'm just starting to use a few that I bought specifically for these posts and again, they're green and blue.  Agggghh!!  I will say that one them, even though it's a blue, really has me outside of my zone.  So I guess I'm taking baby steps in the color world and I'm thrilled to have you all along with me!


*This post is part of a series of color posts.  To see all past colors, click here


Linking to: