-->
Showing posts with label holiday crafting. Show all posts

Monday, March 10, 2014

Easter Basket Bunting Tutorial


I've been a parent for the last 15 Easters.   For about 10 of them, I had the privilege of putting together an Easter basket for my oldest daughter.  I love doing Easter baskets! I think it might have something to do with the challenge of fitting everything into such a small space, while still making it look cute. Why is it that the basket seems much larger when you're shopping for things to go in it, than it does when it's time to fill it?  


Anyway, now that Zoe's two, it's time for me to start playing Easter Bunny again.  This year, I've come up with a something to add a little more charm to the basket, without using up any of that precious basket real estate, and I've put together a little tutorial to share with you.  


 Here's what you do.

Supplies:
baker's twine
Heavy Duty Heat-n-Bond or another iron on adhesive
fabric scraps


Tools:
tapestry needle (it looks like a needle on steroids, found in knitting section)
scissors
marker
iron
ironing board


Directions:
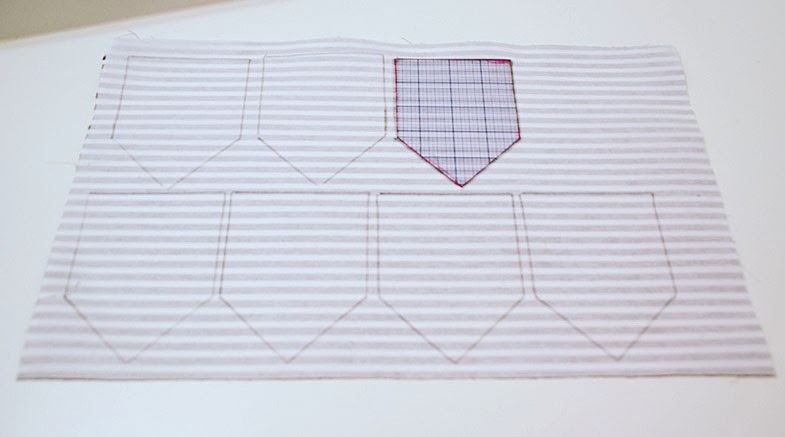
  • Print the bunting template.
  • Rough side down, lay the Heat-n-Bond over the top of the bunting template and trace as many pennants as you need.  
  • Cut shapes out.
  • Rough side down, iron Heat-n-Bond to the BACK of your fabric scraps.
  • After they've cooled down, cut out pennants .
  • Carefully peel the paper backing from the Heat-n-Bond.
  • Now fold your pennants together, shiny sides facing each other. Leave an open section at the top of the triangles.  You'll thread the twine through this opening later.
  • Carefully iron the front and back of the triangle together, making sure not to iron the opening at the top closed.
  • Using the tapestry needle, thread the baker's twine through each flag.
  • Tie to the handle or the front of your basket, removing an flags that don't fit, and trimming any excess twine.


That's it! 


Tuesday, February 4, 2014

Bold Valentine's Day Bunting Tutorial

Last week, I ran across a printable bunting that wasn't exactly in what I would consider traditional Valentine's Day colors.  The flag was made up of horizontal black & white stripes, and then there was a plain red heart in the center.  It was so bold, and eye catching!

I really wanted to make a fabric version of it so I started digging through my fabric stash.  I found one black and white striped fat quarter.  Hmmmm, how would I be able to make enough flags out of this little bit of fabric?  I could just use this fabric on the front, and another on the back.  Or maybe I could just make a single-sided flag. Then I wouldn't have to sew each flag.  How could I make it crisp, and not a droopy mess?  Would interfacing work?  Is that how your stiffen things up, and keep the edges from fraying?  I now know the answers to these questions.  Yes, the interfacing worked.  I was able to kill two birds with one stone.  It reinforced the flag fabric, and finished the edges to keep them from fraying.


Supplies:
1 fat quarter for flags
1 fat quarter for hearts
Pellon iron on interfacing (sold in packages, or by the yard)
Heavy Duty Heat-n-Bond or another iron on adhesive
1 package of red bias tape  
thread to match bias tape
flag template (you can google one)
heart template (you can google one of these too)

Tools:
pen
iron/ironing board
scissors 
spray bottle with water
straight pins
sewing machine


Directions:
For the flags:

  • First, cut your interfacing to the same size as your fat quarter.  
  • Following the interfacing instructions, iron the interfacing to the back of your fabric.
  • Trace the flag template onto the back of the fabric/interfacing square, and cut out. 
 interfacing has been fused to wrong side of fabric


 flag template has been traced onto the interfacing


For the hearts:
When I had my hearts cut out, I lay one on top of a flag to see how it would look.  I was disappointed to find that I could see the stripes of the flag fabric through my red heart fabric.  I decided that I'd need to double my heart fabric to keep the stripes from showing. This part might seem a little involved, but I couldn't come up with a better solution. So...


  • Cut a piece of Heat-n-Bond the same size as your heart fabric fat quarter.
  • Following the instructions, fuse the Heat-n-Bond to the back of your heart fabric.  
  • Once it cools down, peel the paper backing off.  
  • Heat-n-Bond sides together, fold the fabric in half, and iron until the fabric has fused together.
  • Now cut another piece of Heat-n-Bond the same size as your doubled fabric, and fuse it to one side of the doubled fabric.  Leave the paper packing on!
  • Now you're going to trace your heart template onto the paper backing.
  • Cut out your hearts.
 heat-n-bond fused to red fat quarter


 fabric folded over and fused together


2nd piece of heat-n-bond, with templates traced, fused to one side of folded fabric.


Putting it all together:

  • Following the Heat-n-Bond instructions, peel the paper backing from the hearts, and fuse them, one at a time, to their respective flags.
  • Open up the bias tape strip, and tuck your flags in the fold, pinning as your go along. Make sure you leave some room at the ends of the tape for tying.
  • Sew tape to flags, removing pins as you go.  
  • Finish off the ends of the tape by double-folding, and then back or lock stitching.


And there you have it!  A Bold and graphic bunting, just in time for Valentine's Day.  


Linking to:
Take a Look Tuesday @ Sugar Bee Crafts
Wow Me Wednesday @ Ginger Snap Crafts
Tip Me Tuesday @ Tip Junkie
Whatever Goes Weds @ Someday Crafts
Wow Me Weds @ Polka Dots on Parade
Inspire Me Weds @ seven thirty-three
Inspiration Link Party @ City Farmhouse
Thrifty Thursday @ Living Well, Spending Less
Link Party Palooza @ Today's Creative Blog


Monday, January 27, 2014

No Sew Felt Valentine's Day Bunting


Add a little charm to your mantle this year with this simple bunting. This one's a simple project that anyone who can use a pair of scissors and an iron can do.  There's a bit of hand-sewing involved, but it's easy-peasy.


Supplies:
felt - mix of red, white or pink
Heavy Duty Heat-n-Bond or another iron on adhesive
scissors
pen or marker
cardstock
iron
red & white baker's twine
tapestry needle (it looks like a needle on steroids)

- I was able to get four triangles and eight hearts from each sheet of felt.
- I only use Heat-n-Bond so I'm not sure about the durability of other adhesives.
- You cab find baker's twine in the baking section or scrapbook sections of most craft stores.  I've also found it in the dollar bins at Target.
- Tapestry needles can be found in the knitting section of most craft stores.


I used my Sizzix Big Shot for cutting my shapes.  For me, this little machine is the way to go.  It beats tracing templates, and cutting by hand, any day.  If you are lucky enough to own one of these, use it.  If not, you'll need to create a template.  When I go this route, I will either create one in Word by inserting shapes and adjusting the size as needed, or I'll Google a template, copy it and then paste it into a Word document, adjusting the size as needed. 

Once you've have your images, print them on cardstock, and then cut them out.


This next part only applies to the hearts.

1- Trace or using a ruler, mark off and then cut out a piece of Heat-n-Bond the same size or a little smaller than your sheet of felt.
2 - With tacky side down, lay the Heat-n-Bond on top of the sheet of felt. 
3 - Following the package instructions, iron the Heat-n-Bond to the felt. 
4 - Once the paper backing on the Heat-n-Bond has cooled, trace your heart template onto it.
5 - Cut out hearts.

Putting it all together

1 - Trace your triangle template onto felt, and then cut them out. I didn't do this, but cutting with pinking shears will make a nice scalloped edge.
2 - Working with one at a time, remove the paper backing from the hearts, position it onto a triangle, and iron them on.  Acrylic felt can sometimes melt when ironed on high heat.  I've never had an issue, but have read that it can happen, so it's a good idea to lay a scrap of cotton fabric over the top of the felt, to act as a pressing cloth.

After you've gotten all of your pennants done, it's time to string them.  Cut a length of baker's twine to whatever length you need, making sure to cut an extra 2ft.  Using the tapestry needle,  sew twine into the corners of each pennant.  When finished, you should have about a foot of twine left at each end of the bunting for tying.

That's it!


*None of my links are affiliate links.  I'm linking just to show what these products look like. 


Linking to:
Mad Skills Link Party @ Mad in Crafts


Wednesday, November 28, 2012

No Sew Girlie Christmas Outfit


We had family photos done last weekend.  At the last minute, I decided that Zoe needed something festive to wear for some of the photos since this is her first Christmas.   I hopped on Pinterest to find tutorials for the different components of the outfit I wanted to put together.

You don't need a sewing machine to make this outfit.  You will need to hand sew the elastic that you use for the waist of the tutu, but that's it.

This isn't really a tutorial, but more of a collection of tutorials that I used to make this.

We'll start with the hairband.  Here is the tutorial I used to make the flower.  I made two of each size circle and stacked them.  After I burned the edges, I sewed the layers a few times with some thread, and then sewed a button in the center.  To assemble the hairband, I covered the back of the flower with hot glue and then sandwiched the hairband between that and a circle of felt that was cut a little smaller than the flat base of the flower.

 I used this tutorial for the tutu.  I held two strips of tulle together when tying to help make the tutu a little fuller.  I initially bought one roll of tulle and ran out.  I bought the next roll from another store, and it was a different shade of red.  That ended up making the tutu look like it had more depth.  I tied the new shade in between the existing tufts of tulle. 

For the applique shirt, I used Google to find a Christmas tree template I liked and then I used the same method I used for the monthly onesie numbers to make the applique.  Here is the template I used.  I left out the bucket and widened the trunk a bit.

Next up are the leg-warmers.  All I did was take a pair of adult socks and cut the foot off. I bought my socks at Jo-Ann's.  They were probably close to 2ft long in the leg section so you could use them for an older child. I sewed around the cut end of the sock to hem it a little, but if you don't sew, you could just tuck the edge under.  Hemming the edge didn't really make much of a difference.

 It's such a sweet outfit and it really was simple to make.  

Here's one more of my baby in her Christmas outfit.  This is one of my favorite photos of her and her daddy.

Sweetness! 


Linking to:


Tuesday, September 25, 2012

DIY - Faux Antiqued Pumpkins


It seems like you can always find inexpensive foam pumpkins in all the craft stores.  There are oranges, browns and even greens (I guess those are technically squashes), but never white.  I can never find cheap small white pumpkins.  This year, I decided to do something about it.

I bought a collection of various foam pumpkins.  The larger ones, which I haven't finished yet, I got at Target for $2 each.  The smaller ones came from Big Lots at a buck each.  Wal-Mart also has the small pumpkins for about the same price.  I was in Michael's today and they have their Fall decor items on sale this week.  Basically, there's no shortage of these cheap pumpkins.


So you take your pumpkins, and gather the following:
  • brown craft paint
  • antique white craft paint
  • crackle medium
  • glaze

Directions:
  • Paint a couple of thin coats of the brown craft paint onto your pumpkins and let them dry.
  • Following the directions on your crackle medium, apply crackle.
  • Next top coat with the antique white.

After pumpkins have completely dried, do another coat of antique white.  Do this until you like the look you have.  Alot of my cracks were filled in, but there were just the right kind of crack let after my third coat.  The reason I didn't stop at one coat is because if  you brush the first topcoat over the glazing medium too hard, you'll smudge it and it won't look so pretty.  I tried two different crackle mediums, one that you let dry completely before you brush on the topcoat, and one that you just let dry until tacky before brushing on the topcoat, and they both smudged in spots.  The extra topcoat layers hide this.

Once your final topcoats have dried, it's time to glaze.  See here for my glazing tutorial.  

After you've glazed, you might want to go back and paint your stems.  I just used my brown craft paint on mine.


Here's a close-up of my finished pumpkins.


 These beauties are great for a neutral Fall look and for Halloween.


Linking to:
Wow us Weds
Creative Spark 
Made by Me
DIY Fall Festival
Sugar & Spice 
Hookin' Up With HOH
Liz Marie


Thursday, September 20, 2012

Repost - Halloween Ribbon Wreath


*** re-post from 2010***


If given a choice between pretty holiday decorations and cute/whimsical  holiday decorations, I will always choose cute.  I don't know why.  Maybe because cute & and whimsical = happy to me.   There have been a lot of cute Fall and Halloween wreaths floating around here the past few weeks and I'd like to show a few of my favorites.  

I love this Fall Rosette Wreath that Laura from along for the ride made.  I just packed my Fall stuff up, but will be bringing it back out on Nov 1st.  In the meantime, I'll be making one of these to hang up when the time comes.


Then there is this this.  Beverly's (from Flamingo Toes) Semi-Scary Halloween Wreath


Because I love candy corn, I love this Woman's Day inspired Candy Corn Wreath from Karly @ Jellybean Junkyard.


OK, now this one isn't a Fall or Halloween wreath, but it so could be.  I can imagine these pins alternately painted black and orange or white and black.  Also, I think you could use regular clothespins and Mod Podge some Halloweenie scrapbook paper to them.  This one is an Embroidery Hoop Wreath
and it was created by Heidi over at Budget Wise Home.


This one was actually posted last year, but I recently ran across in during a Google image search.  I've already got the stuff to make this one and am hoping to get to it this weekend (fingers crossed because I've been saying that for the past two weekends).  This Plush Wreath was made by Mandi over at Smile and Wave.


I saw this one today through the Craft Gossip Facebook page.  It's a Boo Wreath by Paige Evans.  It's one of the projects from the Oct/Nov issue of Simply handmade.   


After I did my morning chores, I went right out to the local Five & Dime to get the stuff I needed for this.  I omitted the BOO and the bow, but I love how mine turned out.  I still want to get some ric-rac to add a little more whimsy to it.


Linking to:
DIY Fall Festival
Sugar & Spice 

Thursday, April 5, 2012

Knitted Egg Cozies


Aren't they cute?  I found the pattern for them on Ravelry.  You can go directly to this free pattern by clicking here.

I'm planning to put a couple in Han and Zoe's Easter baskets, as well as my niece's and nephew's.  Since most of the kiddos are itty-bittys, I embroidered the eyes instead of using beads as instructed in the pattern.  

I know it's only a couple of days before Easter, but these are so fast to knit.  I'm talking minutes here!  

Happy Easter, everyone!!


Linked to:
Weekend Wrap-up @ Tatertots & Jello 
Whatcha Got Weekend @ Lolly Jane Boutique  

Saturday, February 5, 2011

Valentine Pedestal Bowl

Wow, I can't believe how much feedback I got on my pedestal bowl post.  Thanks so much!  That one bowl, the one with the nest that everyone LOVES, my pal Leslie, from Goodbye House, Hello Home!, is the new owner of it.  She snatched it up the same day I listed it.  Lucky booger!  

Except, not so much.

She had a decorating accident and sprained her wrist(Just had a funny thing happen.  I went over to grab the link to this post and saw the lampshades that she thrifted.  Those are the exact same shades that I donated last weekend.  Oy.  I could have just given them to her)


Anyway, I made another pedestal bowl.  This one is perfect for Valentine's Day decor.  I put it on Etsy, but it's so close to THE day that I'm not sure it'll sell.  I love it, though.
LOVE, LOVE, LOVE


Just to show you that almost anything at the thrift shops... well, not that Pottery Barn catalog that Goodwill had for sale the other day (I swear I think they sometimes try to sell real trash), has potential.  See what this started out as.


Have a good weekend, y'all! 

Saturday, January 29, 2011

FINALLY Finished!

Today I'm sharing a project that I've been working on for about 2 weeks.  It's a magnetic fridge calendar that I made after being inspired by the ones that Jenn, from Clean & Scentsible makes. 

Here's my February calendar.


Because my studio is such a disaster, I ended up buying everything I needed for this.  Thankfully, I was able to get most of it on the cheap.  I got most of my stickers from the dollar bins at Target.  My chipboard letters that spell FEBRUARY also came from Target and were only 99 cents a pack.  They also had some cute packs of Valentine papers that I grabbed.  I found the bottle-caps at Hobby Lobby and I think they were about $6 for 25 or so. 


I bought some round wood chips to use for some of the spots.  They're usually a little over a buck for five or six of them, which isn't too bad, but since I'm planning on making one of these for each month, that might get a bit pricey.  Good thing I found one of these at Goodwill for $1.  SCORE!


Jenn has a list of supplies that you could use to make these and she's got a tutorial.  I might do one myself for the March calendar, but in the meantime, check Jenn's out.


Linking to:
SNS @ Funky Junk Interiors

Thursday, January 20, 2011

Copycat Craft - Valentine Cupcake Liner Topiary

I hope everyone is having a great week.  I sure am and I can't wait to tell you all about it tomorrow for Favorite Things Friday.  In the meantime, I wanted to share with you a craft that I copied last weekend.

It's the Valentine Cupcake Liner Topiary by Jen over at Craft-O-Maniac.  I'm sure you seen it 'cause it's been featured all over the place this week.

Here's my version.

C-U-T-E!!

Sadly, these two things and my Valentine Ribbon Wreath are the only V-day things I have.  I've been busy this week with the shop and haven't had any time to actually craft.  I've got supplied to make another of these a couple of other things.  Hopefully, I'll have a fun-filled crafting weekend and will be sharing more Valentine's Day stuff with you next week.

Don't forget to come back by tomorrow and link up to Favorite Things Friday!


Linking to:
Get Your Craft On @ Today's Creative Blog

Saturday, January 15, 2011

Valentine's Day Ribbon Wreath


I don't normally decorate for V-Day, but after I made those ribbon wreaths for Halloween & Christmas, I knew that I'd be making them for just about every major holiday.  They're just so dang cute and super easy to make.

I don't think I really explained how to make one before so I'll just do a quick run-through here.

Supplies:
Foam Wreath
  • Ribbon & ric-rac in various widths and in colors that match your theme.
  • One wide ribbon 1 to 2 yards long (for hanging the wreath)
  • straight pins (you can use hot glue, but I hate that stuff)
  • scissors
* I bought the heart in the center from the bargain bins at Target for $2.50 and I think it's perfect for this wreath.  I just pinned it's ribbon to the back of the wreath.

  1. Pin the end of a wider ribbon to the back of the wreath form, leaving gaps in between passes.When you have gone all the way around the wreath, pin the ribbon in place on the back of the form and then cut off the excess ribbon.
  2. Fill the gaps in with the rest of our ribbons and ric-rac.  To make this easier and to conserve ribbon, I do this part in pieces.  I pin the beginning of the ribbon to the back of the form, wrap once, then pin in back and cut off the extra.  Doing it this way also allows you space ribbon as you choose.

The back of your wreath will look like this, but who cares???

I'm seeing so many cute Valentine projects out in linky-land and I'm catchin' the bug.  This definitely won't be my last V-Day project.


Friday, December 3, 2010

Favorite Things Friday - No. 3

A couple of weeks ago, Han and I were at Target where she found a cheap felt advent tree in the Dollar Spot.  She thought it was the cutest thing and wanted one so that she could count down to Christmas.  How in the world was it that my almost-twelve-year-old had never heard of an advent calendar?  I had to do something about that and buying a cheap felt tree wasn't gonna cut it.

Because of her age, I didn't want to do the whole "treat for each day" thing.  I just wanted her to be able to count down.  The cutest way to do that would be for her to have a set of countdown blocks.  

Aren't they adorable???  This was one of the most fun Christmas crafts I've done.  It was so much fun deciding what papers to use and it was so gratifying to see the awkward looking block transform as I sanded the edges of the papers off.

I got my blocks from Michael's for 99 cents each.  I've also seen them at Hobby Lobby for around the same price.

I painted my blocks first and then followed these instructions for making the blocks.  Sadly, I do not have a cutter so I had to use stickers for my numbers.  Maybe I'll be using vinyl next year.  Fingers crossed.


Here are two of my favorite things from last week's link party.

This cinnamon and heart garland from Sarah @ Modern Country Style.
So cute and I bet it smells amazing!


Next up are these amazing DIY vintage Christmas blocks by Kaitlyn @ The Birds Nest.
These are up next on my list.  I can use the rest of  the stickers I had leftover from my countdown blocks.  I don't have sheet music, but I do have some vintage sheet music scrapbook paper that I got from Hobby Lobby.  Perfect!


If you were featured, please feel free to grab a button.


the speckled dog


OK, it's your turn.  What are some of your favorite things?


Rules:
There's really only one.  Please, please, please link back to the party so that others can join in.  Also, it'd be really nice of you if you could visit a few of the other linkups and leave a nice comment.


Linking to: