-->
Showing posts with label tutorials. Show all posts

Tuesday, February 4, 2014

Bold Valentine's Day Bunting Tutorial

Last week, I ran across a printable bunting that wasn't exactly in what I would consider traditional Valentine's Day colors.  The flag was made up of horizontal black & white stripes, and then there was a plain red heart in the center.  It was so bold, and eye catching!

I really wanted to make a fabric version of it so I started digging through my fabric stash.  I found one black and white striped fat quarter.  Hmmmm, how would I be able to make enough flags out of this little bit of fabric?  I could just use this fabric on the front, and another on the back.  Or maybe I could just make a single-sided flag. Then I wouldn't have to sew each flag.  How could I make it crisp, and not a droopy mess?  Would interfacing work?  Is that how your stiffen things up, and keep the edges from fraying?  I now know the answers to these questions.  Yes, the interfacing worked.  I was able to kill two birds with one stone.  It reinforced the flag fabric, and finished the edges to keep them from fraying.


Supplies:
1 fat quarter for flags
1 fat quarter for hearts
Pellon iron on interfacing (sold in packages, or by the yard)
Heavy Duty Heat-n-Bond or another iron on adhesive
1 package of red bias tape  
thread to match bias tape
flag template (you can google one)
heart template (you can google one of these too)

Tools:
pen
iron/ironing board
scissors 
spray bottle with water
straight pins
sewing machine


Directions:
For the flags:

  • First, cut your interfacing to the same size as your fat quarter.  
  • Following the interfacing instructions, iron the interfacing to the back of your fabric.
  • Trace the flag template onto the back of the fabric/interfacing square, and cut out. 
 interfacing has been fused to wrong side of fabric
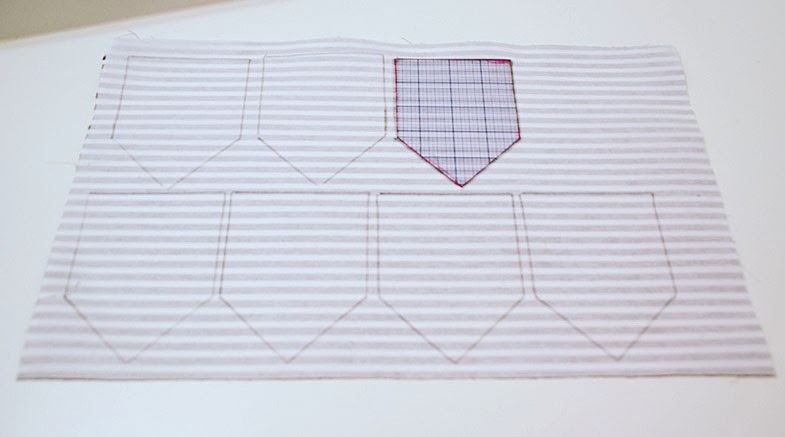

 flag template has been traced onto the interfacing


For the hearts:
When I had my hearts cut out, I lay one on top of a flag to see how it would look.  I was disappointed to find that I could see the stripes of the flag fabric through my red heart fabric.  I decided that I'd need to double my heart fabric to keep the stripes from showing. This part might seem a little involved, but I couldn't come up with a better solution. So...


  • Cut a piece of Heat-n-Bond the same size as your heart fabric fat quarter.
  • Following the instructions, fuse the Heat-n-Bond to the back of your heart fabric.  
  • Once it cools down, peel the paper backing off.  
  • Heat-n-Bond sides together, fold the fabric in half, and iron until the fabric has fused together.
  • Now cut another piece of Heat-n-Bond the same size as your doubled fabric, and fuse it to one side of the doubled fabric.  Leave the paper packing on!
  • Now you're going to trace your heart template onto the paper backing.
  • Cut out your hearts.
 heat-n-bond fused to red fat quarter


 fabric folded over and fused together


2nd piece of heat-n-bond, with templates traced, fused to one side of folded fabric.


Putting it all together:

  • Following the Heat-n-Bond instructions, peel the paper backing from the hearts, and fuse them, one at a time, to their respective flags.
  • Open up the bias tape strip, and tuck your flags in the fold, pinning as your go along. Make sure you leave some room at the ends of the tape for tying.
  • Sew tape to flags, removing pins as you go.  
  • Finish off the ends of the tape by double-folding, and then back or lock stitching.


And there you have it!  A Bold and graphic bunting, just in time for Valentine's Day.  


Linking to:
Take a Look Tuesday @ Sugar Bee Crafts
Wow Me Wednesday @ Ginger Snap Crafts
Tip Me Tuesday @ Tip Junkie
Whatever Goes Weds @ Someday Crafts
Wow Me Weds @ Polka Dots on Parade
Inspire Me Weds @ seven thirty-three
Inspiration Link Party @ City Farmhouse
Thrifty Thursday @ Living Well, Spending Less
Link Party Palooza @ Today's Creative Blog


Tuesday, September 25, 2012

DIY - Faux Antiqued Pumpkins


It seems like you can always find inexpensive foam pumpkins in all the craft stores.  There are oranges, browns and even greens (I guess those are technically squashes), but never white.  I can never find cheap small white pumpkins.  This year, I decided to do something about it.

I bought a collection of various foam pumpkins.  The larger ones, which I haven't finished yet, I got at Target for $2 each.  The smaller ones came from Big Lots at a buck each.  Wal-Mart also has the small pumpkins for about the same price.  I was in Michael's today and they have their Fall decor items on sale this week.  Basically, there's no shortage of these cheap pumpkins.


So you take your pumpkins, and gather the following:
  • brown craft paint
  • antique white craft paint
  • crackle medium
  • glaze

Directions:
  • Paint a couple of thin coats of the brown craft paint onto your pumpkins and let them dry.
  • Following the directions on your crackle medium, apply crackle.
  • Next top coat with the antique white.

After pumpkins have completely dried, do another coat of antique white.  Do this until you like the look you have.  Alot of my cracks were filled in, but there were just the right kind of crack let after my third coat.  The reason I didn't stop at one coat is because if  you brush the first topcoat over the glazing medium too hard, you'll smudge it and it won't look so pretty.  I tried two different crackle mediums, one that you let dry completely before you brush on the topcoat, and one that you just let dry until tacky before brushing on the topcoat, and they both smudged in spots.  The extra topcoat layers hide this.

Once your final topcoats have dried, it's time to glaze.  See here for my glazing tutorial.  

After you've glazed, you might want to go back and paint your stems.  I just used my brown craft paint on mine.


Here's a close-up of my finished pumpkins.


 These beauties are great for a neutral Fall look and for Halloween.


Linking to:
Wow us Weds
Creative Spark 
Made by Me
DIY Fall Festival
Sugar & Spice 
Hookin' Up With HOH
Liz Marie


Tuesday, September 11, 2012

No Sew Baby Monthly Appliques


I want to start out by saying that it's hard to believe my post from this same day, last year was about the crib quilt I made for this sweet button of a girl who will be seven months old on Sunday.  Where does the time go???

Today's tutorial is for no-sew baby month appliques.  Now, I know you can purchase monthly stickers, but these are more personalized, and a little different than what everyone else might be doing.  These are so easy to apply that anyone can do it.  You could give the appliques with a set of plain onesies as a shower gift and new mommy can iron them on herself.  You wouldn't want to iron them on beforehand because it's really hard to know how big a baby will be and what size they might be wearing at a certain age.  I'd recommend either giving the appliques by themselves as a gift or as I said earlier, pairing them with 12 different size onesies.  

Knowing what month baby is due makes it easy to customize these around the holidays.  A January month could be a blue fabric with white dots or snowflakes, February could be a red fabric with little hearts, March with green fabric for St Patty's, and so on.  For whatever reason, this didn't occur to me and it's something a friend suggested to me the other day.  So now, even though I have through month nine done for Zoe, I'll be redoing them to match the upcoming holidays.  

I guess you're probably ready for me to get on with this so here we go!

This tutorial will work for any applique you want to do.  If you decide you'd like to stitch around the applique, I'd recommend either medium or lite Heat-n-Bond.  The ultra-hold will be too hard to sew through.  You should be able to find Heat-n-Bond at any place that sells fabric or sewing notions. Even Wal-Mart has it.


MATERIALS
Various fabric scraps big enough for your numbers
a pen - I find a sharpie is a little easier to use
iron


INSTRUCTIONS
In Word, choose your font style and size and type out numbers 1-12.  I've used Comic Sans @ 400 in BOLD for mine.  Now, print them out. Print them in reverse, or in mirror image if you can. 


Next, rough side down, on top of your printed numbers, trace the numbers onto the smooth, paper side of the Heat-n-Bond.  IMPORTANT:  if you didn't print your numbers in reverse, flip your printouts over before tracing.  If you don't trace the numbers in reverse, they will be backwards once your put them on the onesie.

Now you'll cut around your numbers.  Don't cut them out yet, just cut around them, leaving a 1/4 inch or so space.


I recommend cutting any open spaces in the numbers out first, before bonding.  For example, the 4, 8 or 0.


Following the instructions on the back of the Heat-n-Bond package, bond your numbers to the fabrics you've chosen.  Once you've bonded and let the fabrics cool, you can cut out the numbers.  


Leave the paper backing on until you're ready to bond.  When you are ready to bond the number to the onesie, peel the paper backing off and position it right side up on the onesie.  *Using medium heat, press the iron down on the number for 6 seconds.  That's it!

*If your iron is too hot, or you leave it on the applique too long, it won't bond correctly.  If you do this, let it cool down a little and try again.  


Sunday, July 3, 2011

DIY Beachy Wall Art

Happy 4th (OK, 3rd) guys!  I hope everyone is enjoying this wonderful holiday weekend. 

Last week, I participated in the Beach Bash over at The Country Chic Cottage.  If you missed out on the projects that were posted, head on over and take a look.  Here's the project I shared.

**************************************************************

I want to share with you today, a simple project to help you "beachify" your summer vignettes or even a spare wall you might have.  It's a great way to bring some beach life into your decor.  I'm planning hang mine as a collection in my master bath.

The project I'm sharing is my Simple Beachy Wall Art.  I think the whole project took me less than 30 minutes, and I was able to do the whole thing almost completely with items I already had on had.


Materials Needed
  • assorted frames
  • paint & brushes (optional - My frames were already pretty beachy so I left them as is.)
  • burlap
  • scissors
  • spray adhesive
  • shells


Directions

*If you're going to paint your frames, go ahead and do that first. 

Remove backing and glass from your frame.  

Lay your backing onto the burlap and trace around the backing.  Then cut burlap.  I cut mine a little larger than the size I needed, just in case I made some sort of mistake (I usually always make mistakes).  


Spray backing with a light coat of spray adhesive and smooth the burlap onto the backing.  Any creases or wrinkles in your burlap will be smoothed out at this time.


Let the adhesive set about 10 or 15 minutes, and then trim away any excess burlap.

Put backing back into frame (without the glass).


Now it's time for the fun part!  Lay your frames flat and play around with different shell arrangements until you find the ones you like.


Once you're satisfied, use your glue gun (I couldn't find mine and had to use E600) to glue the shells in place, making sure to leave everything flat until the glue sets.  


That's it! Pretty simple, right??


Linking to:
Met Monday @ Between Naps on the Porch
Mad Skillz Party @ Mad in Crafts
Market Yourself Monday @ Sumo's Sweet Stuff 

Monday, January 17, 2011

Glazed, but Not Confused - Glazing 101 & A Glazing Link Party

I'd like to start out by saying that I'm in no way any kind of professional on this.  I'm just here to show you what works for me.  Once you start glazing, you'll likely to find other tips and techniques that work better for you.  So if something I've told you doesn't work out, please don't come beat me up.  Kidding, kidding!  Seriously, though, I hope someone is able to use what I'm sharing to create beautiful pieces just like I feel I've done.  Alright, let's get this show on the road!

There are several types of glaze out there and the most popular that I've seen are the tintable glazes.  I chose not to go that route because I didn't want to invest too much money in something that I wasn't even sure would work.  I ended up getting this small (half-pint) bottle of Valspar Antiquing Glaze in Asphaltum, which is basically black.


It cost me around $9.  It seemed pricey to me, but I found that with glaze, a little goes a long way.  I've only used 1/4 of the bottle and I've done all of these projects.


Whew!  That's a lot!  I didn't realize just how much that little bit of glaze had done until I went looking for photos.  

Now that you can see just how far you can go with just a little glaze, let's get down to the nitty-gritty.  The how to.

Step 1:  Find your object.  I recommend using something that isn't all that important to you on your first try, just in case it doesn't work out.   Use something from around the house or head on out to a thrift store and get something cheap, but also something you like.  Make sure it's clean before you paint it.


Step 2: Paint your item.  I just use acrylic craft paint.  My favorite brand is Folk Art.  Since it's flat, I don't prime.  You may choose to prime, I don't.  I usually do at least 2 coats of paint.  I sometimes do more depending on how well it's covering.  You don't have to get full covereage because the glaze will most likely cover any flaws, but I do try to get mine as evenly covered as possible.  Anything with grooves, will just be getting glaze in those spots so don't sweat it if you can get it fully painted. The bottle of glaze says to make sure you let your item dry at least 24 hours.  I don't usually do this.  I wait a few hours and then get to it.


Step 3:  Gather your glazing supplies.
  • your item
  • glaze
  • paint brushes (make sure at least one is one of those tiny pointy ones)
  • soft cloths (I use those t-shirt rags that Goodwill sells as cleaning cloths)
  • plastic cup of water (to rest your brush in)

Step 4: Start glazing
  • Shake your bottle of glaze to make sure it's mixed well.  
  • Working in small sections at a time, brush on some glaze, making sure to get down in any nooks and crannies.  
  • Then take a dry cloth and start wiping the glaze off.  
  • Repeat the last two actions until your whole piece has been glazed.
 glaze on

 glaze off


TIPS
*Don't rub too hard because you'll probably find yourself rubbing the base paint off.  If you do this, you can always go back and touch it up.  I'm not sure if this is something priming or letting the painted piece cure the full 24 hours will help, but I'm just too impatient for all of that.  I've just learned to be very careful when wiping.  I usually don't have a problem with this while doing wood pieces so it's probably a priming/curing issue.  Anyway, just do what you think is best.

*You'll probably find some places where the glaze has really settled into some of the crevices.  Like, settled a little too much.  This is where that little brush comes in handy.  Just dip it into your cup of water and then use it to break up some of the pooled glaze.  Use your cloth to wipe away the watery excess.

*If you don't like the way a section looks, you can use some water on a brush and your dry cloth to remove some of the glaze (it's workable for up to 15 mins).  Then just reglaze that section.

*Don't worry about messing the piece up by holding it by an already glazed section.  I do it all the time and it hasn't been an issue.  You'll get some glaze on your hand, but it washes right off.

*I've found on some of the bigger pieces that I needed more than one cloth.  I guess when the glaze builds up on the cloth, it doesn't work as well.  Just be prepared.

* Sometimes a wait a few hours and then go over the piece with some Polycrylic, but I don't always since the glaze gives the piece a nice sheen itself.


That's it!!  You're all finished and you hopefully have given an ordinary object an awesome makeover.


I've decided to make this an indefinite linky party.  If you've used glaze before, link up your projects.  If you learned something from this post and have decided to use glaze for the first time, please link up so I can see your masterpieces!


Linking to:
Get Your Craft On @ Today's Creative Blog
Take a Look Tues @ Sugar Bee 
Frugal Friday @ The Shabby Nest 
Fab Friday @ Frugal & Fabulous Design
Fridays Unfolded @ Stuff and Nonsense
Remodelaholic's Anyon @ Remodelaholic 
SNS @ Funky Junk Interiors