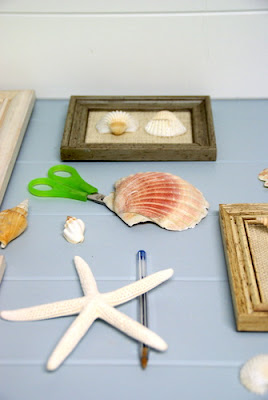
Happy 4th (OK, 3rd) guys! I hope everyone is enjoying this wonderful holiday weekend.
Last week, I participated in the Beach Bash over at The Country Chic Cottage. If you missed out on the projects that were posted, head on over and take a look. Here's the project I shared.
**************************************************************
Last week, I participated in the Beach Bash over at The Country Chic Cottage. If you missed out on the projects that were posted, head on over and take a look. Here's the project I shared.
**************************************************************
I want to share with you today, a simple project to help you "beachify" your summer vignettes or even a spare wall you might have. It's a great way to bring some beach life into your decor. I'm planning hang mine as a collection in my master bath.
The project I'm sharing is my Simple Beachy Wall Art. I think the whole project took me less than 30 minutes, and I was able to do the whole thing almost completely with items I already had on had.
The project I'm sharing is my Simple Beachy Wall Art. I think the whole project took me less than 30 minutes, and I was able to do the whole thing almost completely with items I already had on had.
Materials Needed
- assorted frames
- paint & brushes (optional - My frames were already pretty beachy so I left them as is.)
- burlap
- scissors
- spray adhesive
- shells
Directions
*If you're going to paint your frames, go ahead and do that first.
Remove backing and glass from your frame.
Lay your backing onto the burlap and trace around the backing. Then cut burlap. I cut mine a little larger than the size I needed, just in case I made some sort of mistake (I
Spray backing with a light coat of spray adhesive and smooth the burlap onto the backing. Any creases or wrinkles in your burlap will be smoothed out at this time.
Let the adhesive set about 10 or 15 minutes, and then trim away any excess burlap.
Put backing back into frame (without the glass).
Now it's time for the fun part! Lay your frames flat and play around with different shell arrangements until you find the ones you like.
Once you're satisfied, use your glue gun (I couldn't find mine and had to use E600) to glue the shells in place, making sure to leave everything flat until the glue sets.
That's it! Pretty simple, right??
Linking to:
Met Monday @ Between Naps on the PorchMad Skillz Party @ Mad in Crafts
Market Yourself Monday @ Sumo's Sweet Stuff


Thanks so much for sharing this GREAT idea!
ReplyDeleteThose are great! I love them all! I am sure they will make a wonderful addition to your masterbath! Thanks for sharing!
ReplyDeleteThose are awesome! Thanks for making it look so easy!
ReplyDeletehttp://lifecraftsandwhatever.blogspot.com/
Very cute and beachy-fun and easy project.
ReplyDeleteThanks for sharing!
Enjoy the holiday weekend!
Pretty summery artwork, I'm going to amend the idea with scrapbook paper and halved Christmas ornaments in December.
ReplyDeleteHappy Independence Day.
This is so cute!! Good job!! :)
ReplyDeleteI love it! I did a similar project using burlap and starfish and love the finished product. Such a low cost way to add beachy charm. Nice work!
ReplyDeletePam
I LOVE this! Super cute and easy too! :) we have an extra bathroom that I have been wanting to decorate with a simple beach theme, but wasnt sure what to do... these will be PERFECT! Thank you for sharing! Ive pinned these to my pinterest! :)
ReplyDeleteI’m a fellow poster on BNOTP this week. Enjoyed your post.
ReplyDeleteHope to have you stop by my on-line yard sale. Sheila @ www.junkandjewelsyardsale.blogspot.com
Wow ! what an interesting blog.Thanks for sharing this information.Your information is really informative for us.
ReplyDeleteNice blog on Master Bathroom.
Keep sharing more & more.....
simple & gorgeous! totally ready to do this!
ReplyDeleteFabulous!! I have more shells than the beach itself and this is a super way to turn them into something useful and pretty. Thanks for the inspiration.
ReplyDeleteThanks for sharing this great idea! Love this!
ReplyDeleteWon't would work to help on shells on a brick wall to stay up?
ReplyDelete