-->
Showing posts with label glazing. Show all posts

Tuesday, September 25, 2012

DIY - Faux Antiqued Pumpkins


It seems like you can always find inexpensive foam pumpkins in all the craft stores.  There are oranges, browns and even greens (I guess those are technically squashes), but never white.  I can never find cheap small white pumpkins.  This year, I decided to do something about it.

I bought a collection of various foam pumpkins.  The larger ones, which I haven't finished yet, I got at Target for $2 each.  The smaller ones came from Big Lots at a buck each.  Wal-Mart also has the small pumpkins for about the same price.  I was in Michael's today and they have their Fall decor items on sale this week.  Basically, there's no shortage of these cheap pumpkins.


So you take your pumpkins, and gather the following:
  • brown craft paint
  • antique white craft paint
  • crackle medium
  • glaze

Directions:
  • Paint a couple of thin coats of the brown craft paint onto your pumpkins and let them dry.
  • Following the directions on your crackle medium, apply crackle.
  • Next top coat with the antique white.

After pumpkins have completely dried, do another coat of antique white.  Do this until you like the look you have.  Alot of my cracks were filled in, but there were just the right kind of crack let after my third coat.  The reason I didn't stop at one coat is because if  you brush the first topcoat over the glazing medium too hard, you'll smudge it and it won't look so pretty.  I tried two different crackle mediums, one that you let dry completely before you brush on the topcoat, and one that you just let dry until tacky before brushing on the topcoat, and they both smudged in spots.  The extra topcoat layers hide this.

Once your final topcoats have dried, it's time to glaze.  See here for my glazing tutorial.  

After you've glazed, you might want to go back and paint your stems.  I just used my brown craft paint on mine.


Here's a close-up of my finished pumpkins.


 These beauties are great for a neutral Fall look and for Halloween.


Linking to:
Wow us Weds
Creative Spark 
Made by Me
DIY Fall Festival
Sugar & Spice 
Hookin' Up With HOH
Liz Marie


Friday, August 17, 2012

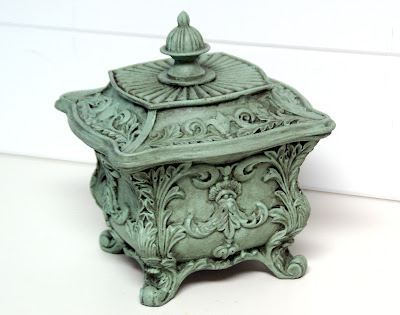
Trinket Box Makeover

It might be hard to believe, but it took me over two years to decide what to do with this box.  Back on April 8th, 2010, I blogged about thrifting this and asked for suggestions on what to do with it.  I just couldn't decide.  I've been using it just the way it is ever since.  For awhile, I had it sitting in my half-bath.  Then I ended up just shelving it in my studio.  


A few weeks ago, I found a paint color that I thought would work well with glazing.  It's an Americana craft paint, which you can get at any big-box crafts store, called Sea Glass.  It's a creamy pale aquamarine color that's great on it's own, but when it's been glazed over, it's gorgeous! 

It's my new favorite color so I'll soon be off to Home Depot for a color match. I've found that these craft paint bottles dry out too quickly, plus it costs more to keep buying those little bottles than it does for a sample from Home Depot or Lowe's.  


***See my glazing tutorial here.***


Monday, January 17, 2011

Glazed, but Not Confused - Glazing 101 & A Glazing Link Party

I'd like to start out by saying that I'm in no way any kind of professional on this.  I'm just here to show you what works for me.  Once you start glazing, you'll likely to find other tips and techniques that work better for you.  So if something I've told you doesn't work out, please don't come beat me up.  Kidding, kidding!  Seriously, though, I hope someone is able to use what I'm sharing to create beautiful pieces just like I feel I've done.  Alright, let's get this show on the road!

There are several types of glaze out there and the most popular that I've seen are the tintable glazes.  I chose not to go that route because I didn't want to invest too much money in something that I wasn't even sure would work.  I ended up getting this small (half-pint) bottle of Valspar Antiquing Glaze in Asphaltum, which is basically black.


It cost me around $9.  It seemed pricey to me, but I found that with glaze, a little goes a long way.  I've only used 1/4 of the bottle and I've done all of these projects.


Whew!  That's a lot!  I didn't realize just how much that little bit of glaze had done until I went looking for photos.  

Now that you can see just how far you can go with just a little glaze, let's get down to the nitty-gritty.  The how to.

Step 1:  Find your object.  I recommend using something that isn't all that important to you on your first try, just in case it doesn't work out.   Use something from around the house or head on out to a thrift store and get something cheap, but also something you like.  Make sure it's clean before you paint it.


Step 2: Paint your item.  I just use acrylic craft paint.  My favorite brand is Folk Art.  Since it's flat, I don't prime.  You may choose to prime, I don't.  I usually do at least 2 coats of paint.  I sometimes do more depending on how well it's covering.  You don't have to get full covereage because the glaze will most likely cover any flaws, but I do try to get mine as evenly covered as possible.  Anything with grooves, will just be getting glaze in those spots so don't sweat it if you can get it fully painted. The bottle of glaze says to make sure you let your item dry at least 24 hours.  I don't usually do this.  I wait a few hours and then get to it.


Step 3:  Gather your glazing supplies.
  • your item
  • glaze
  • paint brushes (make sure at least one is one of those tiny pointy ones)
  • soft cloths (I use those t-shirt rags that Goodwill sells as cleaning cloths)
  • plastic cup of water (to rest your brush in)

Step 4: Start glazing
  • Shake your bottle of glaze to make sure it's mixed well.  
  • Working in small sections at a time, brush on some glaze, making sure to get down in any nooks and crannies.  
  • Then take a dry cloth and start wiping the glaze off.  
  • Repeat the last two actions until your whole piece has been glazed.
 glaze on

 glaze off


TIPS
*Don't rub too hard because you'll probably find yourself rubbing the base paint off.  If you do this, you can always go back and touch it up.  I'm not sure if this is something priming or letting the painted piece cure the full 24 hours will help, but I'm just too impatient for all of that.  I've just learned to be very careful when wiping.  I usually don't have a problem with this while doing wood pieces so it's probably a priming/curing issue.  Anyway, just do what you think is best.

*You'll probably find some places where the glaze has really settled into some of the crevices.  Like, settled a little too much.  This is where that little brush comes in handy.  Just dip it into your cup of water and then use it to break up some of the pooled glaze.  Use your cloth to wipe away the watery excess.

*If you don't like the way a section looks, you can use some water on a brush and your dry cloth to remove some of the glaze (it's workable for up to 15 mins).  Then just reglaze that section.

*Don't worry about messing the piece up by holding it by an already glazed section.  I do it all the time and it hasn't been an issue.  You'll get some glaze on your hand, but it washes right off.

*I've found on some of the bigger pieces that I needed more than one cloth.  I guess when the glaze builds up on the cloth, it doesn't work as well.  Just be prepared.

* Sometimes a wait a few hours and then go over the piece with some Polycrylic, but I don't always since the glaze gives the piece a nice sheen itself.


That's it!!  You're all finished and you hopefully have given an ordinary object an awesome makeover.


I've decided to make this an indefinite linky party.  If you've used glaze before, link up your projects.  If you learned something from this post and have decided to use glaze for the first time, please link up so I can see your masterpieces!


Linking to:
Get Your Craft On @ Today's Creative Blog
Take a Look Tues @ Sugar Bee 
Frugal Friday @ The Shabby Nest 
Fab Friday @ Frugal & Fabulous Design
Fridays Unfolded @ Stuff and Nonsense
Remodelaholic's Anyon @ Remodelaholic 
SNS @ Funky Junk Interiors