-->
Showing posts with label sewing. Show all posts

Tuesday, May 13, 2014

My Mother's Day


I hope all of my fellow moms had a great Mother's Day!

We had a pretty productive weekend.  I'd decided for Mother's Day, instead of gifts, that I wanted to plant flowers.  It'd been something like 5 years since I'd done anything like that.  Aside from two azaleas and a knock-out rose tree, there was no color happening in our yard.  Saturday afternoon, we headed to Lowe's and loaded up.


After breakfast Sunday morning, we headed outside, and got started.  This is where we were about half-way through.


I ran back out to Lowe's for more supplies.


We were out there for hours, and I'd forgotten how much I love being out in the yard, working.  We still have a few more flowers to plant, and then we need to mulch.  I'll share some photos of everything once it's all done.  


I got some sewing done this weekend too.  Saturday afternoon, I started on a little sampler quilt from some of my leftover Scrumptious squares.  I had to stop because I ran out of the cream fabric, and had to order more. I ordered another layer cake of Scrumptious too because I really just love it so much!


Sunday night, I started on a string quilt, using a box of scraps.  


Here's to hoping I get something finished soon!  Until next time...


Friday, March 21, 2014

Favorite Things Friday - No 7


A series of weekly posts, sharing some of my favorite internet finds.


As I started looking through some of my pins to gather some content for this post, I came across one that I'd pinned from Etsy.  It was a sewing pattern for a little girl's dress.  That gave me the idea to look through my Etsy favorites to see what other sewing patterns I'd saved on Etsy.  Did you know you can create boards on Etsy too?  


Anyway, as I looked through my saved patterns, I realized that I usually "like" several patterns from any given seller.  I thought I'd take this week's FTF to feature some of my favorite pattern designers from Etsy.  I'll be featuring several different shops/pattern types, from toys to clothes, to quilts.  Etsy has a great feature called About Me, that allows sellers to give a mini-bio on who they are and how their shop came to be.  Since this feature is optional, not every seller has one.  When it's available, I'll link to it so you can check those out.  I love reading stories about how my favorite shops came to be, and I urge you to take a peek.  If you're a maker, it can be really inspiring to read about others' successes, and to see how they were all newbies at one point!


All of the shops featured sell their patterns as instant PDF downloads.  I love ordering patterns this way because I don't have to wait days to get them in the mail!


My first feature is Kim from Retro Mama.  Retro Mama has been open since the end of 2007.  She's got some adorable softie patterns in her shop.  One cool thing about patterns from her shop, is that she allows you to sell items made from her patterns, as long as you credit her as the designer (following her instructions).  You can find her About Me page here.

I love this bunny pattern so much!  I bought this one last year with the intention of making one for Zoe's Easter basket.  Of course, I never got around to it, but this year, I'm for sure getting it done!  Zoe is a bunny freak, and it'll just make my heart sing to see her loving on a bunny that I made. 


Doxies are by far my favorite dog breed, so of course, I love this Dachshund softie pattern.  I actually purchased an already made one from another Etsy seller, for Zoe's first Christmas. Aren't they just the cutest things?


OK, seriously, how cute is this Hans and Greta doll set???  Just look at those sweet outfits! You can also purchase these patterns from the shop, separately. 


Retro Mama has pages of patterns available, as well as some listings for felt, which can be used for several of her patterns. 


*********


My next feature is Little Lizard King.  I just discovered this shop last weekend while I was looking for a toddler dress pattern.  You can find there About Me page here.

According to their About Me page, they are the largest seller of children's clothing patterns on Etsy.  I certainly believe it because there are so many I ended up adding to my favorites! Like Retro Mama, Little Lizard King allows items made from their patterns to be sold, in limited quantities, with proper credit given to them for designing the pattern. 

The dress that led me to their shop was this one.  I'm planning to purchase this one this week, and have already been planning what fabric I'd like to use. I'm thinking a bold Amy Butler print would look gorgeous here.  


I love patterns that use a bunch of different fabrics.  It might take me forever to choose just the right fabrics, but it's so much fun pulling them all together.  One good this about a pattern like this one is that it's good for stash-busting.  I'm also thinking you could use a fat quarter bundle on the smaller sizes.  That certainly takes most of the work of choosing fabrics, away.  I'm looking at this skirt, and seeing this awesome Joel Dewberry bundle working really well!


 This has to be the most adorable dress I've seen in a long time!  It would make the perfect Easter dress!


In addition to dress and skirt patterns, Little Lizard King also stocks patterns for rompers, tops, bottoms, accessories, boys' patterns and even costumes!


*********


If you like boutique clothing patterns, you'll love this next shop.  Viola Lee is a shop full of boutique clothing patterns for little girls.  I have purchased several patterns from her, and have made two garments using her patterns. I'd consider myself somewhere between a beginner and intermediate when it comes to sewing, and these patterns were a cinch for me!  Vicky's patterns are very thorough, and easy to use.  You can find Vicky's About Me page here.


OK, on to some of my favorite patterns.  I'll start with the two I've used. 


The first pattern I used was the Mattie Mae pants pattern.  I made these as part of Zoe's 1st Birthday party outfit.  They were freaking adorable!


The second pattern I used was the appropriately named Zoe.  It's a Ruffled Dress pattern with an option to make it just a top.  I made one of these last year, and really learned a lot, like how to work with a bodice, which was something I'd never done before.  You can see my version here


I bought the Leatha Lee dress pattern last year as well, and am about to start on it.  I bought several fabrics this week that will work, I just need to narrow them down.


If you're looking for boy patterns, I've just stumbled across Vicky's shop for boy patterns, Fuddie Duddies.


*********


This next shop, Cali Faye Collection, stocks patterns for garments that have a little more of a minimalist feel to them.  I tend to like both the girly-girl boutique style clothes and the minimalist style for Zoe.  I don't want her to be dressed over-the-top everyday so these patterns are excellent for helping add a good mix to her wardrobe.  Wow, I'm talking like she's a grown woman aren't I?  ha!

Cali Faye Collection is run by Sarah, and you can find her About Me page here. Like the other designers, Sarah allows you to sell items made from her designs, on a small business based scale, as long as you give Cali Faye Collection credit for the design.

I am in love with this lovely pullover.  I'm big on dressing Zoe in leggings since they're so versatile, not to mention comfortable, so a pullover like this is perfect to pair with them!  


This next top is just so pretty!  I love the gathers on the front.  The great thing about this top is that it would look good in a small, medium or large print fabric.


This was the pattern that drew me to the Cali Faye Collection shop.  What a cute outfit!  These pants are adorable, and can be made as either a pair of everyday pants, or as PJ pants.  The top is another CFC pattern, which is sold separately.


I hope you've enjoyed this post.  I love supporting other Etsy shops, and feel like in addition to making purchases from them, I can hopefully send a few people, who may not have ever stumbled across them, their way.  Make sure to stop by next Friday for a round-up of my favorite Etsy fabric shops!


Tuesday, February 4, 2014

Bold Valentine's Day Bunting Tutorial

Last week, I ran across a printable bunting that wasn't exactly in what I would consider traditional Valentine's Day colors.  The flag was made up of horizontal black & white stripes, and then there was a plain red heart in the center.  It was so bold, and eye catching!

I really wanted to make a fabric version of it so I started digging through my fabric stash.  I found one black and white striped fat quarter.  Hmmmm, how would I be able to make enough flags out of this little bit of fabric?  I could just use this fabric on the front, and another on the back.  Or maybe I could just make a single-sided flag. Then I wouldn't have to sew each flag.  How could I make it crisp, and not a droopy mess?  Would interfacing work?  Is that how your stiffen things up, and keep the edges from fraying?  I now know the answers to these questions.  Yes, the interfacing worked.  I was able to kill two birds with one stone.  It reinforced the flag fabric, and finished the edges to keep them from fraying.


Supplies:
1 fat quarter for flags
1 fat quarter for hearts
Pellon iron on interfacing (sold in packages, or by the yard)
Heavy Duty Heat-n-Bond or another iron on adhesive
1 package of red bias tape  
thread to match bias tape
flag template (you can google one)
heart template (you can google one of these too)

Tools:
pen
iron/ironing board
scissors 
spray bottle with water
straight pins
sewing machine


Directions:
For the flags:

  • First, cut your interfacing to the same size as your fat quarter.  
  • Following the interfacing instructions, iron the interfacing to the back of your fabric.
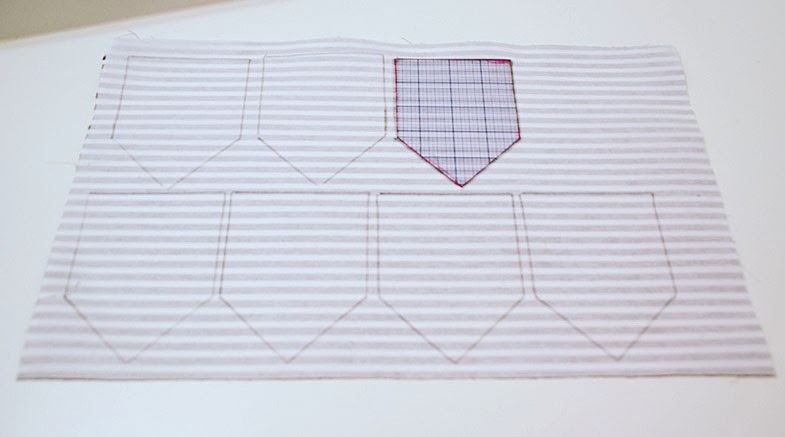
  • Trace the flag template onto the back of the fabric/interfacing square, and cut out. 
 interfacing has been fused to wrong side of fabric


 flag template has been traced onto the interfacing


For the hearts:
When I had my hearts cut out, I lay one on top of a flag to see how it would look.  I was disappointed to find that I could see the stripes of the flag fabric through my red heart fabric.  I decided that I'd need to double my heart fabric to keep the stripes from showing. This part might seem a little involved, but I couldn't come up with a better solution. So...


  • Cut a piece of Heat-n-Bond the same size as your heart fabric fat quarter.
  • Following the instructions, fuse the Heat-n-Bond to the back of your heart fabric.  
  • Once it cools down, peel the paper backing off.  
  • Heat-n-Bond sides together, fold the fabric in half, and iron until the fabric has fused together.
  • Now cut another piece of Heat-n-Bond the same size as your doubled fabric, and fuse it to one side of the doubled fabric.  Leave the paper packing on!
  • Now you're going to trace your heart template onto the paper backing.
  • Cut out your hearts.
 heat-n-bond fused to red fat quarter


 fabric folded over and fused together


2nd piece of heat-n-bond, with templates traced, fused to one side of folded fabric.


Putting it all together:

  • Following the Heat-n-Bond instructions, peel the paper backing from the hearts, and fuse them, one at a time, to their respective flags.
  • Open up the bias tape strip, and tuck your flags in the fold, pinning as your go along. Make sure you leave some room at the ends of the tape for tying.
  • Sew tape to flags, removing pins as you go.  
  • Finish off the ends of the tape by double-folding, and then back or lock stitching.


And there you have it!  A Bold and graphic bunting, just in time for Valentine's Day.  


Linking to:
Take a Look Tuesday @ Sugar Bee Crafts
Wow Me Wednesday @ Ginger Snap Crafts
Tip Me Tuesday @ Tip Junkie
Whatever Goes Weds @ Someday Crafts
Wow Me Weds @ Polka Dots on Parade
Inspire Me Weds @ seven thirty-three
Inspiration Link Party @ City Farmhouse
Thrifty Thursday @ Living Well, Spending Less
Link Party Palooza @ Today's Creative Blog


Sunday, July 28, 2013

Kid Sewing - A Simple Shirt


I've really gotten into sewing clothes for Miss. Z lately.  She's in a 12-18 month size right now, so anything I make usually takes less than a yard of fabric.  I've sewn a couple of things from a traditional pattern, you know the ones, they're made of tissue paper and come in an envelope and then open up as big as a road map or a newspaper.  Personally, I find them unwieldy and too time-consuming to work with.  I've found that PDF patterns and tutorials are much simpler, and are more thorough at giving instructions.  

When I get the itch to sew, I hop on my Kid Sewing board to look through what I've pinned over the last couple of years, to see if I can find something simple that'll provide me with almost instant gratification.  (Isn't it fun to look through a board and find things you'd forgotten you'd pinned.  You get excited about them all over again.  It's like Christmas!)  A couple of weeks ago, I decided to try this dress, only instead of a dress, I wanted a big shirt.  One she can wear now and hopefully again next year.  I'm thinking it might work in cooler weather with a long-sleeved shirt under it.  It's an easy enough project for a beginner, and it certainly beats ones of those packaged patterns.  

It's made from this fabric (from Amy Butler's Lotus collection), which I've been saving for years, for just the right project.  I'd never have imagined it would be used to make a shirt for a future munchkin.  Life's funny like that, I guess.

I've got more projects to share, and I've got some big changes coming for this little blog.  One being that I'm going to be blogging more often (a lot).  I've missed being in this space.

Wednesday, June 5, 2013

Summer Sewing - Zoe Ruffle Top


I've kicked up my sewing a good bit lately, and have been branching out into clothing.  I'm really one who learns by doing (a lot of doing) and I figured if I ever wanted to be as comfortable sewing as I am knitting, I'd better get to it.  Right now, I'm just sewing for Zoe.  Since she's itty-bitty, it doesn't take quite as long to get something finished.

I really like using the patterns from Viola Lee because they're so easy to follow.  The written instructions are very clear, plus there are tons of photos.  The Zoe Ruffle Dress/Top is my second finished item using VL pattern, and my third pattern ever (the first was a pillowcase dress).  Yes, they're that easy.  Another plus to using these patterns is that she allows you to sell items made from her patterns.  Cool, right???


The fabrics I used are from JoAnn's.  I was able to use fabric I had leftover from the pillowcase dress I made which is totally awesome since I didn't need to buy more fabric.  Wait...  since when is not buying new fabric awesome?  Hmmmm....


Sunday, September 16, 2012

Pinterest Inspired - Quilt Binding Tutorial

Last year, I created a board for all of the things I'd tried from a pin and succeeded at.  I've decided to start doing posts on these and then pinning my posts to the Pinned It, Made It, Loved It board. 

.................


I'm really bad about putting off learning something new because it seems too intimidating.  After putting it off, for sometimes years, I'll finally do it and have a major "DUH" moment when I realize that it wasn't nearly as complicated as I'd expected.

This most recently happened with quilt binding.


Back in 2007, I began quilting.  Nothing fancy, just some really primitive beginner stuff.  After all of the work I put into my quilts, I would finish them pillowcase style because I was afraid to try binding.  Now, there's nothing wrong with finishing that way, it just looks so much better when they're finished by binding.

One day back in Jan, I decided to look for a binding tutorial.  I came across a really great one, which I promptly pinned and then tried.

It's from Diary of a Quilter and it's a great tutorial on how to do binding with half machine stitching and half hand stitching.  She even teaches you how to make your own binding!  She's also got a tutorial for binding completely by machine, but I haven't tried that one. YET.

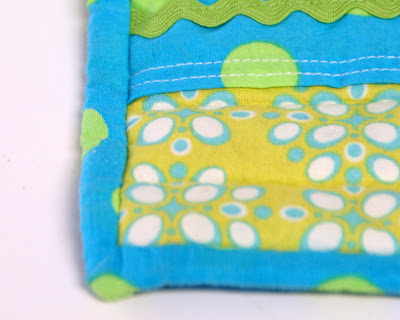
Just like everyone else, I hate to waste my time, so I made a couple of pot holders to try this out on.  It worked perfectly! 


Since finishing the pot holders (I plan to make many, many more of those), I've quilted and bound a small floor blanket for Zoe and a small quilt for her.  

If you've been afraid to try binding, I want you to just stop it and get on with it already.  You'll feel like a big old dorkus for not trying it earlier.  


Monday, May 21, 2012

Goings On

Or maybe, too many sticks in the fire.

There's been a lot of handiwork going on around here.  Most of it involves fabric where last year, it was paint.

Can't wait to get some of this stuff finished so I can share!


Saturday, May 19, 2012

Pinterest Inspired Project - Infant Peasant Dress

A couple of months back, I created a board for all of the things I'd tried from a pin and loved.  I've decided to start doing posts on these and then pinning my posts to the Pinned It, Made It, Loved It board. 

A week or so before Zoe was born, I decided to try the Infant Peasant Dress from Sew Much Ado.  
 (closed eyes because it was pretty bright out there)

This was a very simple project.  I consider myself a beginner when it comes to sewing clothes, and this was pretty easy for me.  I decided to skip the elastic for the arms, because I wasn't sure how to maneuver such small holes on the machine.  I think for the next one I make, I'd sew the elastic into the arm casings, before sewing the arm seams, and then trim the excess elastic.  I don't really think the elastic in the armholes are necessary so if you choose to skip this part too, it wouldn't be a big deal.


Tuesday, April 3, 2012

Pinterest Inspired Project - The Layer Cake Skirt

I recently created a board for all of the things I'd tried from a pin and loved.  They're mostly food pins, but there are a few crafty's mixed in.  

I've decided to start doing posts on these and then pinning my posts to the Pinned It, Made It, Loved It board.  

The last two weeks of my pregnancy, I went through a flurry of sewing projects.  I guess that was my way of nesting.  I didn't have much energy to do much else.  You know, like cleaning.  

The first sewing project I tackled was the Layer Cake Skirt.  I made one for my niece, Ava, using coordinating fabrics from Hobby Lobby.  The day I brought it over to have her try it on for photos, she just happened to already be wearing matching clothes.  Perfect!


Linked to:
Wow us Weds @ Savvy Southern Style
Sugar & Spice @ seven thirty-three
Transformation Thurs @ The Shabby Creek Cottage 
Fridays Unfolded @ Stuff and Nonsense
Show and Tell Friday @ My Romantic Home 
Creative Things Thurs @ The Vintage Farmhouse  
Free for All Friday @ Sassy Sites 
Frugal Friday @ The Shabby Nest  
Frugalicious Friday @ Finding Fabulous  

Sunday, September 11, 2011

A Perfectly Imperfect Quilt

It looks like I'm just a day shy of a month with no posts.  Sorry about that!

Let's see, I last posted about planning to decorate my new master bedroom.  We've been in that room for three weeks now and I love it!  I've still got to hang curtains and also hang a few other things up, and then I'll be back to blog about that.

Right now I want to share with you a couple of things.

Number One:  We had an early gender ultrasound and found out that we're expecting a GIRL!!  We were all three hoping for a girl.  Her name will be Zoe Quinn.  Charles chose the first name, years ago, and I chose the middle name.  Actually, it was a name Han suggested several years ago, back when we used to sit around and try to come up with names for fun.   

Number Two:  I immediately went back to my original plan of a girly nursery with blues and reds instead of the colorful gender-neutral nursery I thought I wanted.  

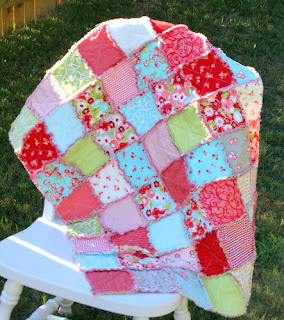
I have a pretty good board going on Pinterest for all of my ideas, and I've already started on making some things.  This weekend, I finished this quilt.


It's a rag quilt that was inspired by this one made by Kristin at Write it Down.

I loved the fabric she used, but sadly, it's no longer available.  Luckily, I was able to find a similar fabric line from Moda called Ruby.  I bought 2 charm packs and ended up using 70 of the 84 squares (I left most of the gray fabrics out).  I used cotton batting in the craft size, and for the backing, I used some matching fabrics from my stash.

I say this quilt is imperfect because it is.  All of my quilts are.  I'm what you'd call an impatient quilter.  I try to get them done as fast as I can, and this often means that my blocks don't match up like they should, and I usually end up having to trim up the sides of my quilt tops because some rows end up longer than others.  You know what though? I'm OK with this.  The quilts I make are never going to be in a quilt show.  They're never going to be passed down from generation to generation.  They're meant for right NOW, to snuggle up in while taking a nap or watching a movie.  If you're like me, or if you've never even tried a quilt, this one is for you!  The ragged seams will take away from the fact that you have wonky blocks and rows, and the quilting-as-you-go part?  Shoot, quilting can't get an easier than that!

The tutorial I used, which is the same one that Kristin used, is here at Creations by Kara.  Kara mentions that flannel is the best fabric for flannel, but I honestly didn't have any problems with just plain old cotton. 

Well, that's all I've got for now.  Hopefully I'll be back later this week with a master bedroom update. 


Linking to:
Motivate Me Mon @ Keeping it Simple
Met Monday @ Between Naps on the Porch 
Amaze Me Monday @ Dittle Dattle

Tuesday, September 21, 2010

Making Felt Leaves


Ok, I thought about something when I sat down to write this post.  I hope, hope, hope that nobody thought I actually made the felt for the leaves.  I'm sure there is a way to do it, but I'm also sure it's not worth it when you can buy a sheet of felt for 25 cents.
 

What you need:
  • sheets of felt in various fall colors (I got mine at Hobby Lobby)
  • embroidery threads in colors that match your felt
  • embroidery needle
  • scissors
  • images of leaves
  • straight pens
  • a blue water soluble fabric pen (not necessary, but helpful)

What you do:
  • Google "leaf clip art" and find the images you like.  
  • Enlarge the images and then print them out.  I usually just copy the image and then paste in into a Word document and resize it from there. 
  • Cut the leaf image out and pin it to a piece of felt.
  • Cut around the leaf template.
  • Remove the template.
  • Next, with the water soluble pen, map out any leaf veins on your cut out felt leaf.

  • Using a simple stitch, stitch over your marks. 

  • When you're finished with the embroidery, rinse the leaf in cold water to remove the ink lines.  The backs might look like this, but that's ok.

That's it!  

I've decided to wait and do the "putting it all together" in another post so look for it tomorrow. 


This post is Part 3 of 4 of my Fiber Fall Wreath Series.
See Part 1 here.
See Part 2 here.


Linking to:
Tutorial Tues @ Hope Studios
Fall Festival @ This Blessed Nest 
We Did It Weds @ Sew Much Ado